Lo slicing dei supporti SLA è ora notevolmente più veloce, soprattutto per i modelli con molti supporti, grazie allo slicing analitico della geometria dei supporti.
Riduzione dell’utilizzo della memoria per lo slicing SLA, con le sezioni di supporto calcolate su richiesta anziché memorizzate tutte in una volta.
Sono state aggiunte diverse opzioni di sovrascrittura del materiale SLA per i supporti, i pad e gli strati sfumati.
Sono stati corretti diversi bug, tra cui un arresto anomalo della webview su Linux, un problema nell’interfaccia utente della funzione “inclinazione” di SLA, un tooltip errato dei parametri personalizzati e un raro arresto anomalo della procedura guidata di configurazione. Il runtime Flatpak per Linux è stato aggiornato a GNOME 50.
Version 2.9.4
7. 11. 2025
Junction Deviation Integration
Improved Time Estimation
Versione 2.9.3
12. 9. 2025
Nuovo raffreddamento ‘Superficie uniforme’: logica più intelligente per una migliore qualità delle pareti esterne su layer veloci.
Accelerazione spostamento breve: riduce il ringing rallentando solo gli spostamenti più brevi sui perimetri esterni.
Parametri G-code personalizzati: definire le proprie variabili nei profili per una personalizzazione flessibile del G-code.
Version 2.9.2
10. 4. 2025
STEP file quality importer
Bug Fixes
Version 2.9.1
11. 3. 2025
Sequential printing just got way more exciting!
The PrusaSlicer team is proud to be the first to introduce Smart Sequential Printing Arrange, an advanced solver-based approach that pushes the limits of 3D printing. Our unique algorithm intelligently arranges objects to prevent collisions, making sequential printing more efficient and reliable than ever. This feature enables your printer to complete individual objects one after another rather than printing everything at once from the bottom layer up.
Sequential printing drastically reduces nozzle travel and is especially useful when you need to eliminate stringing and oozing between individual objects. It also helps maintain consistent layer adhesion, reducing issues like delamination (layer separation) or poor bonding between layers. Moreover, it could also prevent losing multiple half-finished prints if one of the objects detaches from the print bed. Finally, you can sequentially print multiple objects in vase mode, which is impossible with normal printing!
Additionally, a 3D extruder model is rendered while browsing through the Preview with the horizontal slider (as seen above). This little “time-lapse” speaks volumes—for successful sequential printing, no part of the extruder (or axis rods and cables) can bump into any of the objects already on the plate. The calculation requires detailed information about the extruder geometry, which is why the feature is now only available for Prusa printers (except the MK2). We might add support for third-party printers later.
To try out sequential printing, just enable Complete individual objects (in Print Settings → Output options) and then use the Arrange tool (or press “A”) in the Plater view. Then, you can press “E” to display the printing sequence.
Cooperation with academia
We implemented this feature in cooperation with Professor Pavel Surynek from the Czech Technical University in Prague, who created the advanced printing algorithm, which will even be published in a scientific paper. This is one of the excellent outcomes of our long-term collaboration with academia. After all, we are Prusa Research!
Bond any filaments with multi-material interlocking!
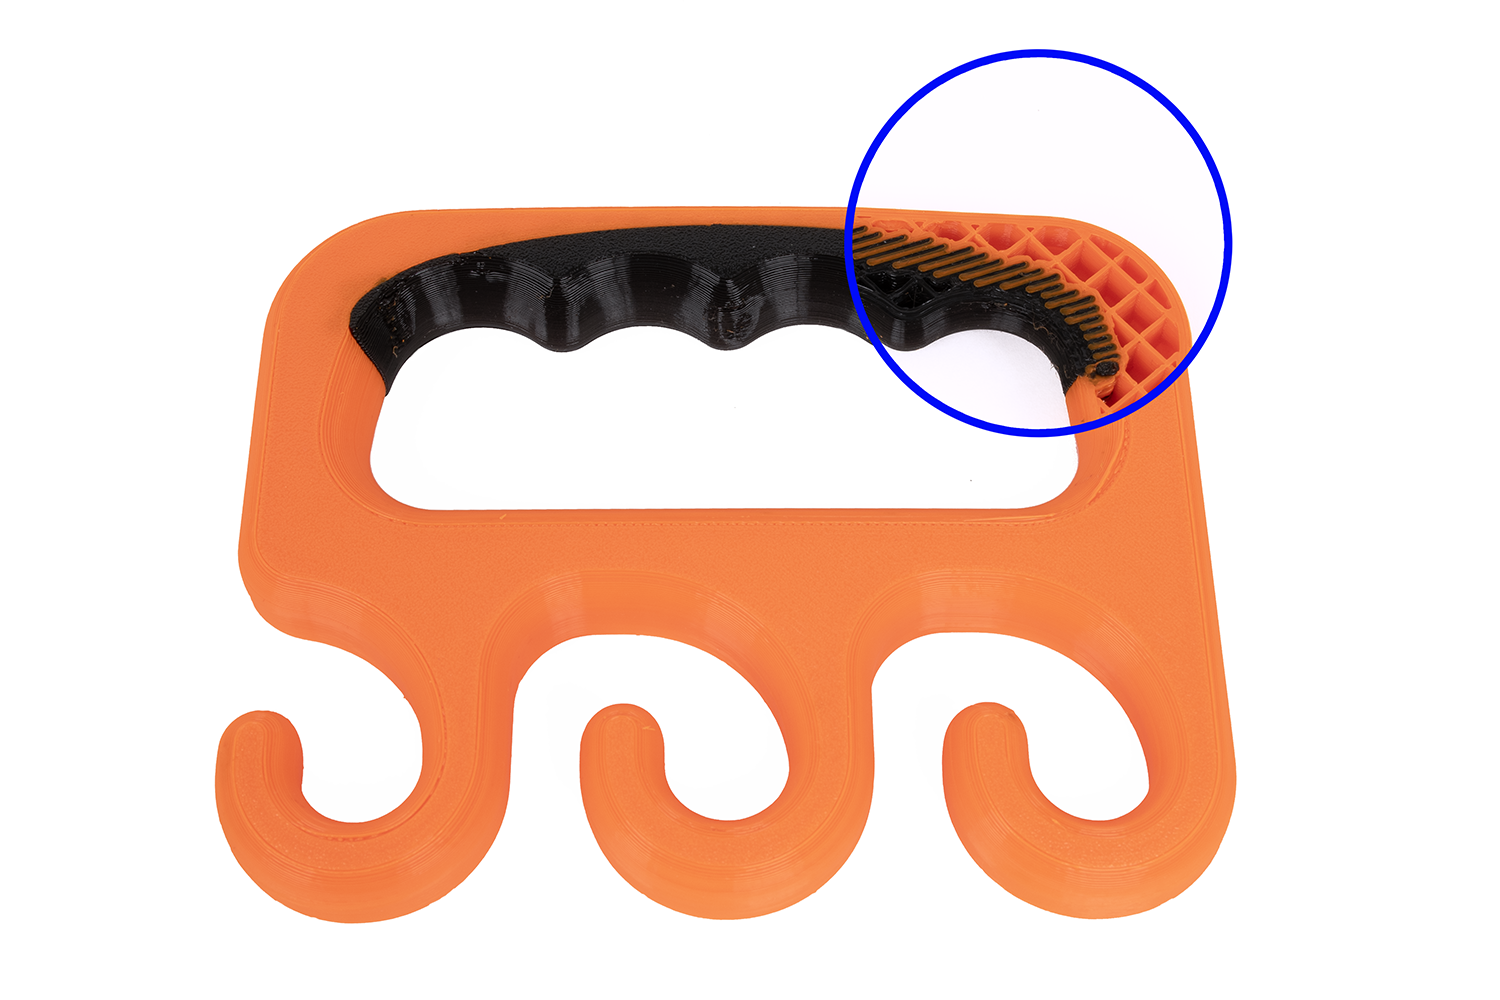
PrusaSlicer can now interlock neighboring parts made from different materials, creating a cross-hatching boundary between them. This creates a bond for filaments that don’t usually stick together, such as PLA, PETG, and FLEX, greatly simplifying the process of printing on multi-extruder printers like Prusa XL. Before this interlocking feature, you would need cleverly designed models with anchors to lock the materials together physically.
A shopping bag carrier with a partially flexible handle for a more comfortable grip. The cross-hatching texture between the materials is hidden inside the print, while the outside remains nice and clean.
Interlocking works both for specifically designed models with separate meshes and for materials assigned with painting tools and modifiers within PrusaSlicer. This simplifies the design process and can quickly turn a regular model into a multi-material one.
To try this feature, enable “Use beam interlocking” in the Multiple Extruders settings. The slicer will handle the rest. Of course, you can fine-tune the result with various settings.
The feature was initially developed in Ultimaker Cura and subsequently ported to OrcaSlicer. With only minor modifications, it was derived and implemented in PrusaSlicer. We are grateful to everyone involved in developing this feature!
Automatically generate reliable supports for SLA
We are introducing a completely new SLA support spot generator that replaces the current solution and provides more accurate and predictable support placement. The new algorithm better identifies the areas that need support and adjusts the support strategy accordingly. It is also non-randomized, consistently producing the same results when given the same input. Overall, this represents a significant improvement over the previous algorithm, which often failed spectacularly, even in very simple cases.
Additional changes make it easier to manage supports and enhance visual feedback:
Support density can now be adjusted using a single slider—moving it instantly updates the preview, allowing for smooth and quick adjustments and fine-tuning.
A new toggle for displaying the support structure allows users to hide or show the entire support construction for better model visibility.
Manually added points are no longer ignored – when the user presses Automatic Support Generation, the algorithm considers them and adjusts the surrounding support density accordingly.
Support types are color-coded, distinguishing islands, manual edits, and overhang supports.
Simplified printing with different materials
PrusaSlicer will now prompt you to use a new setting called Bed temperature by extruder when printing with multiple materials. This setting helps you choose the appropriate temperature that would work best for all materials.
We also released an updated configuration profile for Prusa XL that includes the Breakaway presets. These are specifically designed for printing the main object and supports with different filaments, such as PLA and PETG. As mentioned above, these materials don’t stick together well, which is ideal for creating easily removable supports.
Other improvements
We added new parameters handy for fine-tuning, which can be found in the Speed section of Print Settings. You can now separately set the First layer solid infill speed, and also the speed of infill over bridges – useful if you want to slow down only on these tricky areas specifically.
In the SLA Material printing profiles, you can now click one of the new buttons to quickly set all tilt-related fields to predefined values corresponding to the legacy profiles: Fast, Slow, and High Viscosity.
As always, there are many more improvements and bug fixes that couldn’t fit into our blog post. Please see the Github release page for detailed information about all the changes!
