Version 2.9.1
11. 3. 2025
Sequential printing just got way more exciting!
The PrusaSlicer team is proud to be the first to introduce Smart Sequential Printing Arrange, an advanced solver-based approach that pushes the limits of 3D printing. Our unique algorithm intelligently arranges objects to prevent collisions, making sequential printing more efficient and reliable than ever. This feature enables your printer to complete individual objects one after another rather than printing everything at once from the bottom layer up.
Sequential printing drastically reduces nozzle travel and is especially useful when you need to eliminate stringing and oozing between individual objects. It also helps maintain consistent layer adhesion, reducing issues like delamination (layer separation) or poor bonding between layers. Moreover, it could also prevent losing multiple half-finished prints if one of the objects detaches from the print bed. Finally, you can sequentially print multiple objects in vase mode, which is impossible with normal printing!
Additionally, a 3D extruder model is rendered while browsing through the Preview with the horizontal slider (as seen above). This little “time-lapse” speaks volumes—for successful sequential printing, no part of the extruder (or axis rods and cables) can bump into any of the objects already on the plate. The calculation requires detailed information about the extruder geometry, which is why the feature is now only available for Prusa printers (except the MK2). We might add support for third-party printers later.
To try out sequential printing, just enable Complete individual objects (in Print Settings → Output options) and then use the Arrange tool (or press “A”) in the Plater view. Then, you can press “E” to display the printing sequence.
Cooperation with academia
We implemented this feature in cooperation with Professor Pavel Surynek from the Czech Technical University in Prague, who created the advanced printing algorithm, which will even be published in a scientific paper. This is one of the excellent outcomes of our long-term collaboration with academia. After all, we are Prusa Research!
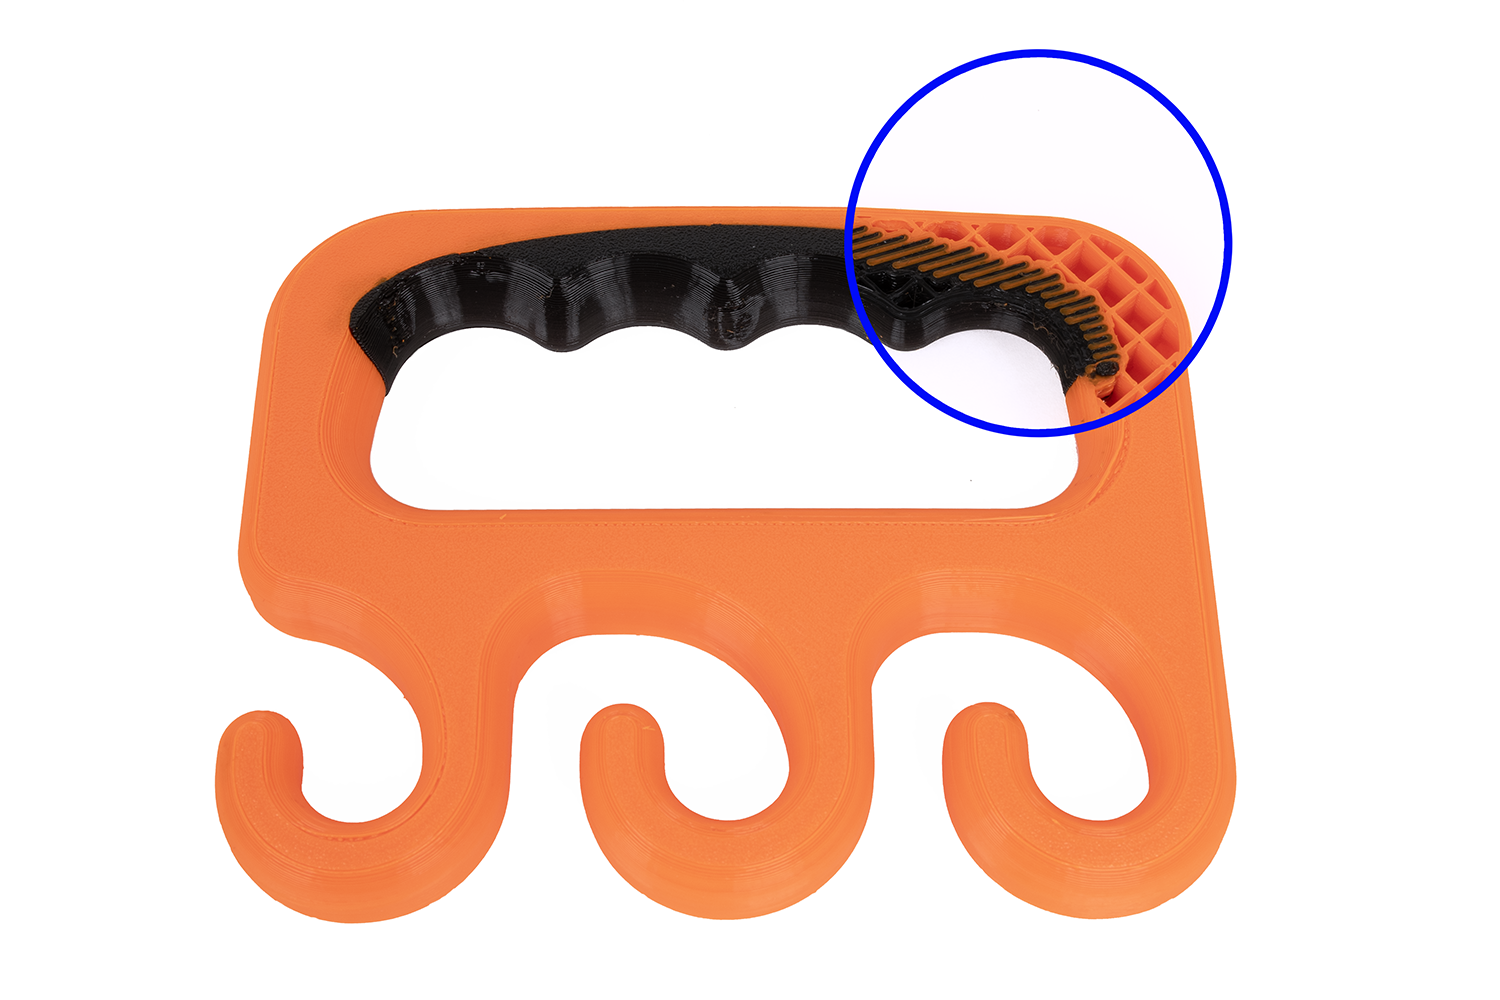
Bond any filaments with multi-material interlocking!
PrusaSlicer can now interlock neighboring parts made from different materials, creating a cross-hatching boundary between them. This creates a bond for filaments that don’t usually stick together, such as PLA, PETG, and FLEX, greatly simplifying the process of printing on multi-extruder printers like Prusa XL. Before this interlocking feature, you would need cleverly designed models with anchors to lock the materials together physically.

A shopping bag carrier with a partially flexible handle for a more comfortable grip. The cross-hatching texture between the materials is hidden inside the print, while the outside remains nice and clean.
Interlocking works both for specifically designed models with separate meshes and for materials assigned with painting tools and modifiers within PrusaSlicer. This simplifies the design process and can quickly turn a regular model into a multi-material one.
A cable passthrough grommet with a flexible cable tunnel and rigid outer structure.
To try this feature, enable “Use beam interlocking” in the Multiple Extruders settings. The slicer will handle the rest. Of course, you can fine-tune the result with various settings.
The feature was initially developed in Ultimaker Cura and subsequently ported to OrcaSlicer. With only minor modifications, it was derived and implemented in PrusaSlicer. We are grateful to everyone involved in developing this feature!
Automatically generate reliable supports for SLA
We are introducing a completely new SLA support spot generator that replaces the current solution and provides more accurate and predictable support placement. The new algorithm better identifies the areas that need support and adjusts the support strategy accordingly. It is also non-randomized, consistently producing the same results when given the same input. Overall, this represents a significant improvement over the previous algorithm, which often failed spectacularly, even in very simple cases.
Additional changes make it easier to manage supports and enhance visual feedback:
- Support density can now be adjusted using a single slider—moving it instantly updates the preview, allowing for smooth and quick adjustments and fine-tuning.
- A new toggle for displaying the support structure allows users to hide or show the entire support construction for better model visibility.
- Manually added points are no longer ignored – when the user presses Automatic Support Generation, the algorithm considers them and adjusts the surrounding support density accordingly.
- Support types are color-coded, distinguishing islands, manual edits, and overhang supports.
Simplified printing with different materials
PrusaSlicer will now prompt you to use a new setting called Bed temperature by extruder when printing with multiple materials. This setting helps you choose the appropriate temperature that would work best for all materials.
We also released an updated configuration profile for Prusa XL that includes the Breakaway presets. These are specifically designed for printing the main object and supports with different filaments, such as PLA and PETG. As mentioned above, these materials don’t stick together well, which is ideal for creating easily removable supports.
Other improvements
We added new parameters handy for fine-tuning, which can be found in the Speed section of Print Settings. You can now separately set the First layer solid infill speed, and also the speed of infill over bridges – useful if you want to slow down only on these tricky areas specifically.
In the SLA Material printing profiles, you can now click one of the new buttons to quickly set all tilt-related fields to predefined values corresponding to the legacy profiles: Fast, Slow, and High Viscosity.
As always, there are many more improvements and bug fixes that couldn’t fit into our blog post. Please see the Github release page for detailed information about all the changes!
Happy slicing!
Version 2.9.0
20. 12. 2024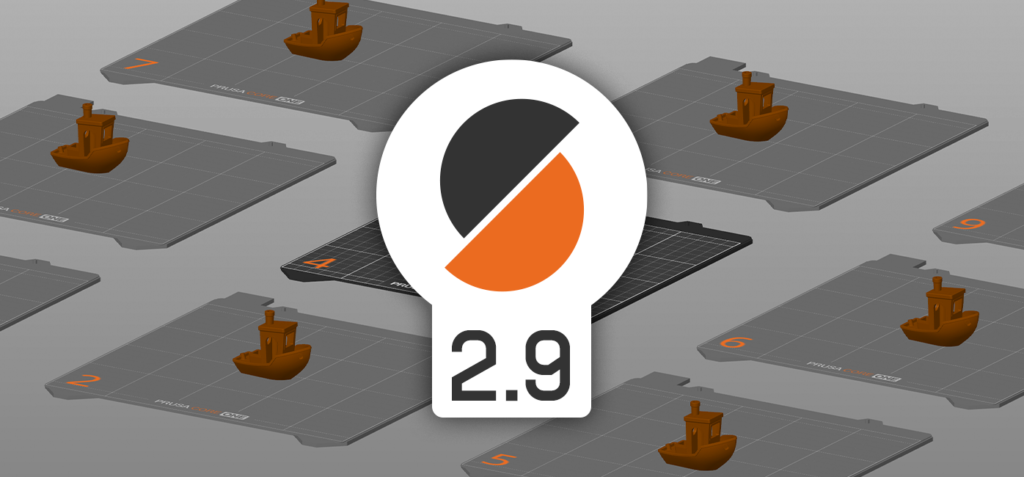
Multiple beds and bulk export
You can now use up to 9 beds in a single scene. This allows you to handle more complicated projects (which do not fit a single bed) more easily than before. All the beds share the same print settings, so you would typically use this feature to organize multi-part prints. The Arrange tool now spreads objects across multiple beds if they would not fit on a single one. A separate button that arranges objects only within the active bed was also added.
Beds are also automatically added and removed based on your interaction. Simply move objects to the space where another bed would be, and it will spawn. The beds are always arranged in the same 3 x 3 grid, making them easy to keep track of.
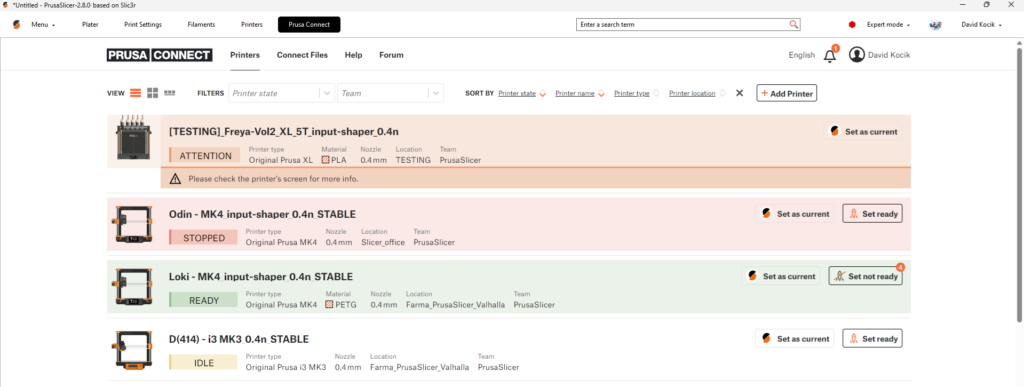
You can slice the beds individually or all at once. If you choose the latter option, you can then bulk export the G-codes or add them all to the print queue via Prusa Connect. The export screen even provides useful statistics about the overall print time and filament use.
Automatically detecting multiple beds in older PrusaSlicer projects
PrusaSlicer had a minimal concept of virtual beds for many years, which is obvious from the Arrange function. When there were too many objects to place on a single bed, PrusaSlicer would keep adding them spaced as if there were other beds next to each other. If you load such a project into PrusaSlicer 2.9.0, this situation is detected and the objects on these virtual “beds” are moved so they actually end up on a non-virtual bed in the grid. It’s also worth mentioning that several PrusaSlicer forks (OrcaSlicer/BambuStudio) have already expanded on the original functionality and while the implementation in PrusaSlicer is completely independent, it was useful to see how they approach the problem.
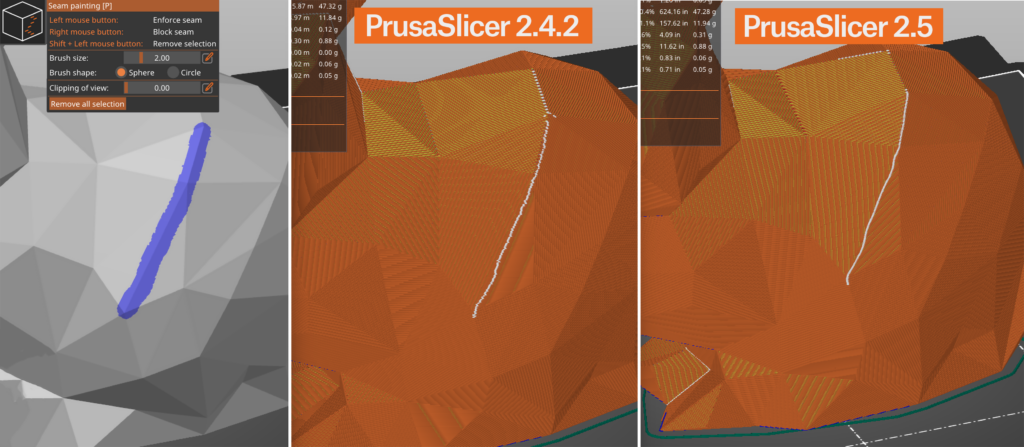
Scarf seams
We’ve added a new seam option dubbed “scarf seams” by the community. Its primary purpose is to hide visible seams on smooth perimeters, which is achieved by overlapping extrusions at the start and end of a perimeter loop. The name of the feature originates from a similar technique in woodworking called the “scarf joint.”
In the example above, a cylinder is printed with both a regular seam and a scarf seam. Number one marks the scarf seam start, number two is its end, and number three is a standard seam. The scarf seam greatly reduces the visibility of the usual seam. Yet, it is not a silver bullet, as it may generate a new “ghost” seam, albeit much less visible than the original seam.
Thanks to @MichaelJLew and @vgdh for coming up with this idea, and @Noisyfox for its implementation into OrcaSlicer. Our implementation is original but mimics the functionality of the OrcaSlicer feature.
Printables integration
Printables is now a persistent tab in Prusaslicer’s top bar. It is available to all users, even without logging in. The tab is implemented as a webpage within a WebView, allowing users to access the familiar features and functionalities of the Printables website.
Similarly to the web version, you can browse 3D models within the Printables tab and seamlessly open them on the Plater tab using the Slice button featuring the Printables logo, or send G-codes directly to your printer via Prusa Connect.
Paint-on fuzzy skin
The new fuzzy skin painting tool, available from the left toolbar, allows you to easily add fuzzy skin to parts of objects without using modifiers. It features a few brush types and a smart fill tool similar to the multi-material tool and the support painting tool.
This new tool complements the overall improvement of fuzzy skin generation. Previously, it split an object into separate regions with their own perimeters. The new implementation works as you would intuitively expect, only affecting the outside perimeter. The texture quality of the fuzzy skin has also been improved.
Improvements in painting tools and multi-material slicing
The height range tool was added to the multi-material painting, allowing you to create perfect horizontal stripes of color across the whole object.
The bucket tool has also been improved and now includes a fill angle setting, similar to the smart fill tool. This works great with the height range tool, which you can use to mark the borders for coloring.
The processing of painted models has been improved, and various types of artifacts have been fixed. This means the sliced models will now better match how they were painted.
Support for printing with different nozzle diameters
Experimental support for printing with different nozzle diameters on multi-tool printers, such as the Original Prusa XL, is now available for experienced users and developers. This workflow allows combining nozzles of different diameters (e.g., a smaller one for fine perimeters and a larger one for fast infill). Check out our Knowledge base for a step-by-step tutorial.
Check out the PrusaSlicer release page for further details about the above-mentioned features and the complete list of all changes and bug fixes.
We truly appreciate all the wonderful contributions from our community members who help make PrusaSlicer and its forks even better!
Version 2.8.1
19. 9. 2024- Based on the feedback received after 2.8.0 release, the menu bar was reinstated and the menu no longer hides under a button. Thanks everyone for the feedback, it was very helpful and it will be taken into consideration during possible UI-related decisions in the future.
- When logging-in with the PrusaAccount using third party authorization (Google, Apple, Facebook), an external browser window is opened so the user is not forced to enter their credentials into windows created by PrusaSlicer.
- The built-in web engine no longer remembers the user after logout.
- There are two new parameters:
Filaments->Advanced->Abrasive materialandPrinters->Extruder->High flow nozzle. Both flags will be used to check whether a sliced G-code is compatible with the given printer (abrasive material requires hardened nozzle) and also to ensure that “Set as current” function in PrusaSlicer-embedded Prusa Connect will select the suitable profile for the given configuration.
Note that this feature is supported since MINI/MK4/XL firmware version 6.2.0-alpha1, and that the implementation in Prusa Connect is not completely finished yet, meaning that the dialog where printer is selected does not use this information – it will later start working without the need to download a new slicer version. - Automatic orientation of bridges has been improved. Issues with unanchored bridges caused by inconvenient choice of their angle should now occur less frequently, although there is still a large class of scenarios where the solution is suboptimal.
- The output of
--query-printer-modelscommand line option was extended to contain bed shape and dimensions. Note that custom bed shapes are currently not supported. - The ‘new version available’ notification can now be used to direct the user to our website, instead of just downloading the executable. As of now, we release two different Linux AppImages, so the user needs to be able to choose which one they want to download.
- A new infill type called Zig-zag was created. It behaves the same as Rectilinear, except that the pattern is aligned between layers (Rectilinear is optimized for short travels, which leads to inconsistencies). The new infill may thus take slightly longer to print because of that, although the effect will be negligible in most prints. It is possible that Rectilinear and Zig-zag will be merged into a single infill type in one of the upcoming releases.
IMPORTANT NOTE FOR LINUX USERS!
PrusaSlicer now depends on WebKit library, which greatly complicates its distribution. Latest Linux distributions (such as Ubuntu 24.04, Fedora 40) ship with newer version of WebKit than older (but still supported) distros. Bundling WebKit into the AppImage is difficult and may not be possible.
Therefore, we now provide two separate AppImages, both depending on webkit library. You may need to install the respective package before you are able to run PrusaSlicer.
| Build | min libwebkit2gtk version | distributions examples |
|---|---|---|
| older-distros | 4.0 | Ubuntu 22.04, Fedora 39, Debian 11 |
| modern-distros | 4.1 | Ubuntu 24.04, Fedora 40, Debian 12 |
The AppImages can extract themselves when run with --appimage-extract command line parameter.
It is quite likely that PrusaSlicer will switch only to Flatpak deployment from the next version on. The AppImage made sense when it could be used in the “bundle what you need, distribute a single file” way, but having to distribute several different AppImages and maintaining the required build infrastructure (and still worrying about what needs to be updated when some Linux distribution update is released) means burning time that we would much rather invest into actual work on PrusaSlicer.
Version 2.8.0
27. 6. 2024This release introduces several UI improvements, Prusa Account login and Prusa Connect integration, improved G-code viewer, better seams, single perimeter for top and bottom layers, and more many more improvements and bugfixes.
Improved UI
We have decided to do several tweaks to the user interface. It is by no means a complete redesign, so the controls are mostly where you are used to find them. The most visible change is the top bar. The system menu was removed (on Windows and Linux only) and it is now accessible through a separate button at the very left of the top bar. The settings tabs are now larger and styled. The larger top bar allowed us to integrate the Search field into it, so it is readily accessible and it looks the same regardless of which tab is active (unlike in previous versions). The right part of the top bar features the Simple/Advanced/Expert switch (which is newly a dropdown) and the PrusaAccount login box.
Next, both sliders in the Preview have been completely reworked and are now part of the 3D scene, instead of being placed in a neighboring panels. Apart from looking nicer and more modern, removing the side panels means that the canvas size is larger. It also comes with a nice benefit that switching back and forth between the 3D view and Preview no longer shifts the view, the views are now perfetly aligned.

Credits go to BambuStudio, whose sliders were used a starting point for the implementation (although we later ended up rewriting most of it to fit current PrusaSlicer architecture).
Topping the list of the UI improvements, the spacing and icon size in the toolbars in the scene was slightly changed. The toolbars are now nicer and look less cramped.
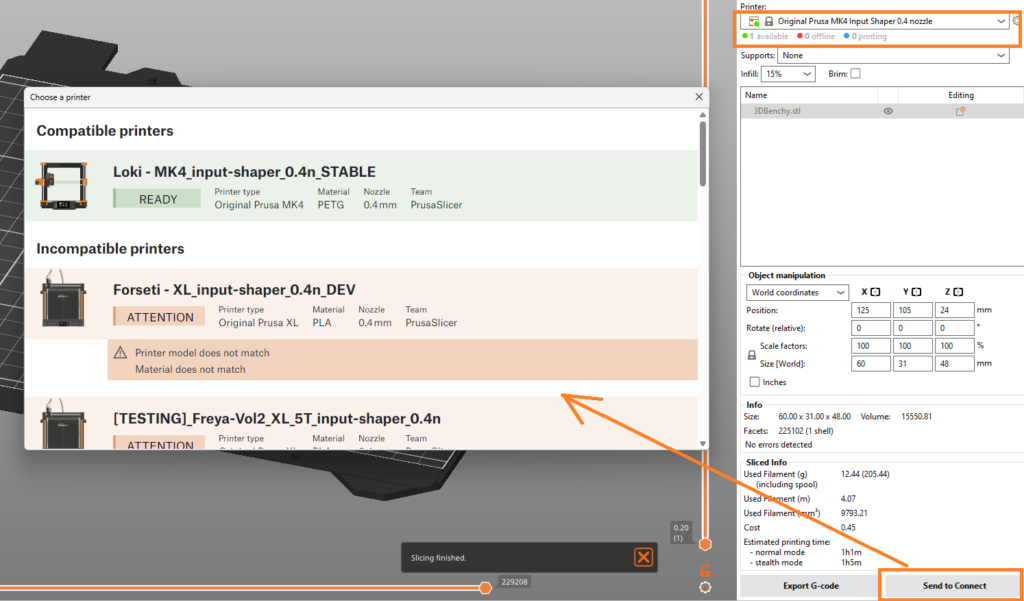
Prusa Connect integration
Prusa Connect is our online system to control printers from the browser and distribute print jobs among them. Starting with this release, Prusa Connect is accessible directly from PrusaSlicer to streamline the workflow. A login box was added to the right of the top bar. When the login is successful, one more tab (Prusa Connect) will appear in the top bar. This tab will present your Prusa Connect dashboard and all features that you are used to.
When logged in, PrusaSlicer keeps track of the status of your printers and it also knows with which of your printer profiles they are compatible (printer model, MMU capabilities and nozzle diameter are checked). When a printer compatible with a given printer profile is in Prusa Connect, a little colored dots will appear in the printer profile dropdown in the right panel, displaying current status of that printer. The summary of the state of connected printers is shown just below the dropdown.
When a G-code is ready to be exported, a ‘Send to Connect’ button appears in the right panel. Clicking this button will open a dialog window presenting all your Connect printers compatible with the current project and allowing you to send the generated G-code to one of them.
To streamline the workflow in the other direction, there is an extra button in Connect labeled “Set as current”, which is shown for every printer. Clicking it will switch back to Plater tab and select first compatible printer profile automatically. The language settings and light/dark mode in the Prusa Connect tab is automatically switched so they match what is currently selected in PrusaSlicer.
Previous way of sending G-codes to Prusa Connect using a physical printer profile is deprecated. Users should stop using physical printers for Prusa Connect, although the support will be maintained for some time. Nothing changes with regard to PrusaLink or the other print hosts.
Note that logging in or using Prusa Connect is completely optional. PrusaSlicer will work fine without the login, as it has worked before. We are considering to add a Preferences checkbox to hide the login box completely to not bother people who intend to never use it anyway.
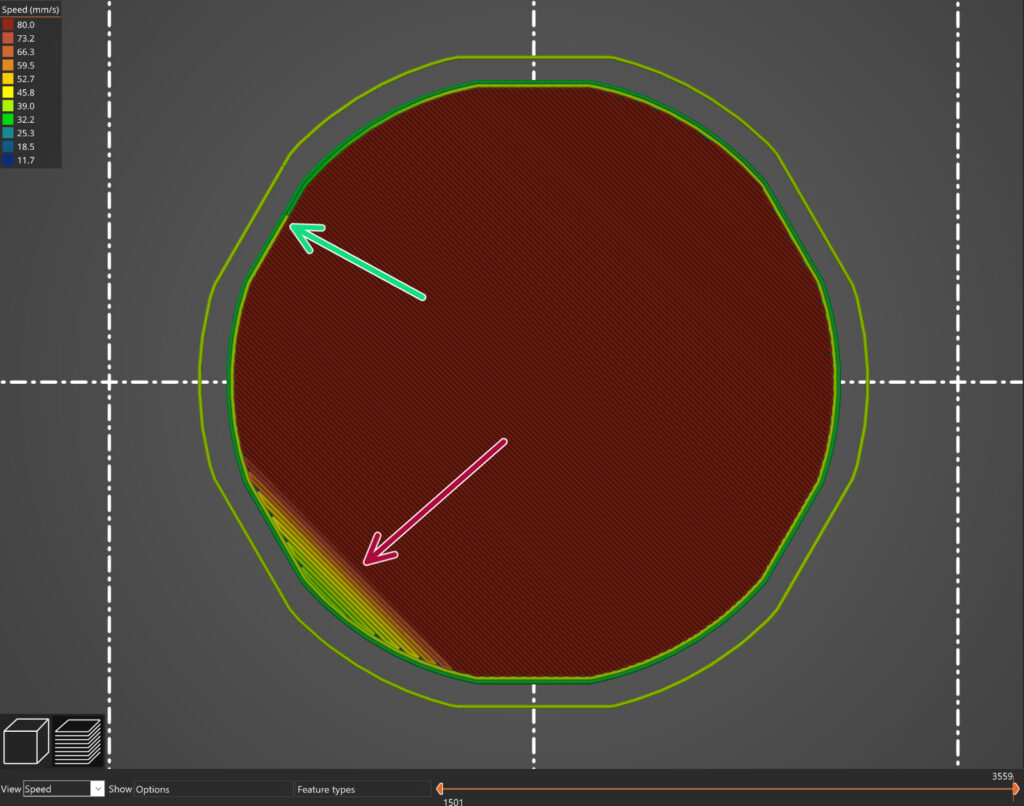
Improved G-code Viewer
The integrated G-code Viewer has been significantly reworked to improve its performance. Less data are now transmitted between the CPU and GPU and more of the work is now performed on the GPU side.
Furthermore, G-code Viewer is now able to visualize actual speed. The printer accelerates and decelerates when direction changes, so even though the required speed is set to a given value, it takes some time to reach it (if it is reached at all). The acceleration limits are (as they always were) configurable in Printer Settings -> Machine limits and PrusaSlicer always calculated with the acceleration and deceleration phases to get precise time estimate, but it did not allow to visualize them.

Note that the same disclaimers as for precise time estimates hold. If the machine limits are set incorrectly (in the sense that the printer uses different values), both the time estimate and the real speed visualization will not align with reality. Also, the actual speed visualization is not available for firmware flavors for which slicer does not allow setting the machine limits.
In addition, when moving the horizontal slider, there is a new popup dialog showing the data that G-code Viewer has about current segment, including the actual speed profile:
Single Perimeter for top and bottom layers
We have ported an option to use single perimeter for (top) solid infill layer. The feature can be configured in Print Settings -> Only one perimeter and based on the configuration, it results in single perimeter on all solid infill layers, on top solid infill layers or on topmost solid infill layers. This generally leads to improved visual look of the printed object, without sacrificing structural rigidity.
This is a frequently requested feature, which was first implemented in SuperSlicer, ported over to OrcaSlicer and then reimplemented in BambuStudio. We have ported the code from BambuStudio with only small changes. Even though we ended up not using the original SuperSlicer implementation, we would like to thank to everyone who implemented the feature there and who worked on a PR with the port (#10648), namely @supermerill, @vovodroid, @mjonuschar. Thanks also go to @bambulab for rewriting the feature later.
New system profile updating system
Since Slic3rPE 1.40 (released six years ago), PrusaSlicer has a built-in profile updater. Its task is to deliver read-only “system” profiles, which are fine tuned for the given printer and filament, sparing the user from having to tweak the individual parameters. The database of profiles has been growing ever since, and it contains many profiles, both for Prusa products and products from other vendors.
We have now split the profile database into several profile “repositories”. Profiles are updated only from repositories that PrusaSlicer is subscribed to. The repositories are selected at the beginning of the Configuration Wizard. The transition of your previous configuration requires no action on the user’s side, the repositories are automatically selected based on your currently installed profiles.
This brings the following benefits:
- Configuration Wizard loads faster, because it generally processes less data.
- Notifications informing about an existing update are only shown for your active repositories. E.g. if you only use SL1 printer, you are not disturbed by notifications about updated filament profiles, which are not relevant to you.
Offline updates
We have also covered the problem of updating system profiles on computers without internet connection. Not connecting a computer to the internet is an obvious security measure in environments where data leaks would pose a problem. However, the profile updater in PrusaSlicer relied on internet connection and there was no way of updating the profiles on such off-the-grid stations. They had to rely on undocumented and very user-unfriendly copying of configuration folders, transferring settings as config bundles, etc.
It is now possible to download a file containing the configuration update for a given repository from our website (note that the URL and the website are also in an alpha stage). This file can then be loaded as an “Offline repository”, and the configuration process treats is the same way as it would use an online update. This gives the user a possibility to update profiles by transferring this file to the off-the-grid computer on a removable drive, distribute it using a local network storage, etc.
These files can be loaded (and removed) also in the Configuration Wizard. PrusaSlicer remembers path to the loaded files and it tries to use them anytime when configuration update is triggered.
Seam improvements
Placement of seams is not a very well defined task, and it has many solutions. After the last big batch of changes in the seam placing algorithm (in 2.5.0-alpha2), the placing of seams was detrimental on various models.
In this release, the seam-placing algorithm was significantly changed to improve the results. We also did some other changes which allow the seam placing algorithm to do a better job. To name the most visible improvements:
- The ordering of perimeters was optimized to avoid unnecessary long travels between individual loops.
- To further reduce long travels, in some special cases where there are two external perimeters the seams are placed in roughly the same spot.
- The previous algorithm for aligned seams produced the seams from discontinuous “seam chains” picked heuristically on the object’s surface. Consequently, the old algorithm needed to fit a curve through the resulting seam points to achieve an aesthetically pleasing result. This worked for some models but produced worse results on others, where a strange “wiggling” appeared in places where a straight line was expected. This was particularly noticeable on very simple cylindrical models. The new seam aligning algorithm avoids this issue by employing a simpler strategy, more similar to the one used before 2.5.0-alpha2. It plans the seam from the bottom up, snapping to sharp corners. This approach generates several possible seams and selects the best one based on visibility criteria.
- One of the improvements in 2.5.0-alpha2 was the use of a seam visibility metric for seam placement. This worked well for seam hiding and the new algorithm still uses the visibility metric as the main criterion to pick the best seam possible.
- Previously, a single algorithm with different optimization criteria was used for both the aligned seam and the rear seam. This meant that the rear seam placement suffered from the same issues as the aligned seam algorithm (notably the artifacts produced by curve fitting). Another reported issue with the rear seam algorithm was that it had no notion of object center. In many use cases it is desirable that the seam is not only in the rear part of the object but also centered. Now there is a completely new separate algorithm for rear seam placement that tries to satisfy both criteria (rear and center).
- The nearest seam algorithm is now fully separated. It now simply first searches for the nearest corner to the previous position. If there is none it picks the nearest point on the perimeter.
Version 2.7.4
5. 4. 2024This is a small patch release:
- Objects from 3MFs generated by BambuStudio now retain multimaterial painting when loaded
- Fixed a bug where downloading files from Printables did not work when enabled in Preferences
Version 2.7.3
28. 3. 2024This is the stable release, bringing minor improvements and several bugfixes.
Improvements to multi-material printing
We implemented changes to the printing volume settings and new filament tip routines used by the MMU3 on the MK4.
Vase mode smoothing
When using spiral vase mode, the toolpaths are generated as usual and the resulting extrusions are then extruded while gradually increasing z. This approach led to seam-like artifacts on the print in places where the layer transitions would normally be. In addition, the last layer would end abruptly, creating a sharp “edge” where the extrusion ends.
Both these issues were addressed by @andrewboktor by interpolating between adjacent layers and by gradually reducing extrusion flow at the very end of the print. The improvement was recently merged into OrcaSlicer, and we got a pull request with a port to PrusaSlicer. After we evaluated the feature, we decided to merge it because it is well written, well working and very useful.
Thanks to @andrewboktor for the time and effort invested into the issue, and to both @vovodroid and @tg73 for providing a pull request with a port from OrcaSlicer
Support for 3MF files generated in BambuStudio
PrusaSlicer is now able to open 3MF files generated by BambuStudio and load geometry from them. (#10718, PR #10808, thanks to @cmguo). Please note that BambuStudio allows to save a 3MF containing G-code only, which is not supported by PrusaSlicer and loading of such 3MFs will fail.
Metadata with boundary polygon of each object
Metadata of binary G-code have a new item named objects_info, which lists all the objects in the print and their boundary polygons. The same info was added into the comments at the end of ASCII G-codes. This is useful for controlling the Cancel object feature remotely via Prusa Connect.
Version 2.7.2
29. 2. 2024This is the stable release, bringing minor improvements and several bugfixes.
Improved Multi-Material Painting
We implemented several mechanisms to detect a non-valid Voronoi diagram, and by manipulating the input, we could ensure that the Voronoi diagram would be valid. We also reimplemented a significant part of multi-material painting from scratch, which, together with the changes above, should resolve all issues with spilled layers for multi-material segmentation.
Color Change (M600) Community-Driven Improvement
Previously, PrusaSlicer placed the color change (M600) right after the previous layer was finished. The default implementation of color change in pretty much all firmwares returns the nozzle to the exact same position as before the color change started. As a result of this behavior, a small blob of filament with the newly loaded color would get stuck to the print.
Our community, especially @Nohus, came up with a solution of placing the color change after moving to the next layer and position, which proved to be much easier and more universal solution than changing the M600 implementation on the firmware side. Thank you, Nohus, for your implementation and all of you who participated in testing his change.
Ramping Travel Moves: Smoother and More Efficient
We’ve replaced helical layer changes introduced in 2.7.1 with a more refined ramping profile. While the helical layer changes helped to reduce stringing, they sometimes caused color blobs and artifacts. With the new and refined ramping profile stringing is still mitigated without the disadvantages of the helical movements.
SLA Overrides
For SLA printing, we’ve introduced Material Overrides. This new feature, mirroring the flexibility of FDM slicing, allows to override selected configuration options from Print or Printer Settings in Material Settings. There is a new parameter page in Material Settings, which allows to check the parameters which would be overridden and to redefine their value.
A Farewell to Pearl
PrusaSlicer’s origin is based on the Slic3r project, which was originally written in Pearl scripting language. Over the years, we’ve rewritten nearly all of the code. First the slicing core, then the user interface. We have now rewritten all remaining unit tests still depending on Pearl into C++. Goodbye, Pearl. You will not be missed.
Version 2.7.1
14. 12. 2023This is the stable release, bringing minor improvements and several bugfixes.
Binary G-code settings
The option Export as binary G-code was removed from Print Settings. Instead, there is a new option in Printer Settings named Supports binary G-code so it can be set at printer level. There is also a new global switch in Preferences->Other, which controls whether binary G-code will be generated for printers which support it. It is now much easier to turn the feature on or off without doing any changes in profiles.
Wipe tower weight
Wipe tower weight was added into G-code metadata so it can be easily displayed in the print statistics on the printer’s display.
Bugs fixed with respect to 2.7.0
Fixed the issue where when ramping travels were enabled, sometimes a perimeter was missing at the layer where the spiral starts.
Fixed a crash when selecting embossed text while an SVG tool is opened.
Fixed a case where helical layer changes could result in out of bed moves.
Fixed a case where helical layer change was enabled even when there was no retraction on layer change.
Version 2.7
8. 12. 2023SVG emboss tool
In addition to the text embossing tool first presented in PrusaSlicer 2.6.0, it is now possible to emboss SVG images onto the models. The feature can be accessed through right button click and it allows similar options for projection and manipulation like the text tool. You can now just drag and drop an SVG logo, title, or even a QR code and merge it with an existing 3D model.
New Binary G-code format
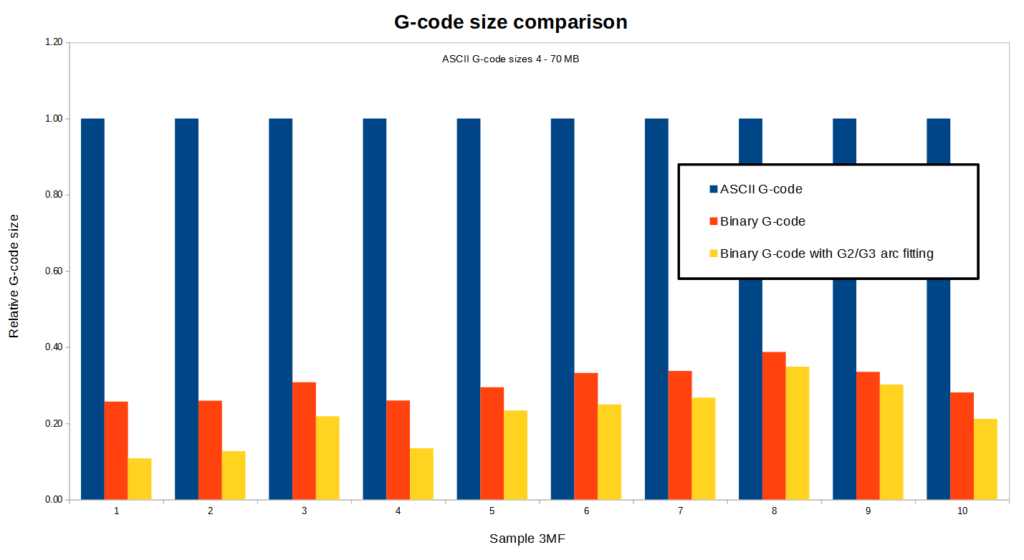
G-code files are easy to read and interpret, but their downside is that the data is not saved efficiently and the file size is often very large. Compression of the file is problematic because the printers usually run on limited hardware and they may not have enough memory and/or CPU power to decompress it. Several solutions to the problem were proposed by members of the community, such as MeatPack encoding (utilizing the fact that the character set of a typical G-code is very limited) or heatshrink compression algorithm (designed to have very small memory requirements).
We are proposing a new standard for a binary G-code format for encoding and compressing ASCII G-code files (see the specification). The format is flexible and the encoding and compression of individual blocks is variable. We also provide libbgcode library which contains the routines to convert ASCII G-codes to binary and vice versa. The library is written in C++ and the repository includes bindings for Python.
Regarding comparison of ASCII vs binary G-code sizes, the result depends on the contents of the G-code. Our testing shows that using binary G-code reduces the size by about 70 % on average. Using arc fitting (described above) at the same time can reduce the size even further. Following chart shows the comparison for 10 randomly selected 3MF projects:
The support for the new .bgcode file format was implemented in PrusaSlicer, including its export, loading configs, previewing G-code or file associations. Exporting binary G-code can be enabled in Print Settings->Output options->Export as binary G-code. An option to convert ASCII G-code to binary (or the opposite) has been added into File menu.
To print a binary G-code, it has to be supported by firmware of the printer. For Original Prusa MINI, MK4 and XL printers, this is supported since version 5.1.0-alpha2. It is necessary to update printer firmware before using the binary G-code format.
We would like to thank Scott Vokes (@atomicobject) for his work on heatshrink and
Scott Mudge (@scottmudge) for developing and maintaining MeatPack.
More improvements
- Custom G-code editor
- Cancel Object feature
- Improved user interface
- Generate Wi-Fi credentials for your MK4 / MK3.9 / XL / MINI 3D printer for easier network connection
- PrusaConnect print host is now available for Original Prusa MINI printer
Version 2.6.1
6. 9. 2023Improved Arrange Tool
The Arrange feature has been significantly improved and it is now able to place objects inside concave areas formed by other objects.
Currently there are three distinct levels of geometry handling, which can be selected using a drop-down in the Arrange dialog:
- Fast – essentially the old behavior considering only the convex hulls of each object
- Balanced – still reasonably fast profile considering the full shape complexity of objects which are not being arranged and the convex hull of the currently arranged object.
- Accurate – considers the full shape complexity of each object at all circumstances
“Balanced” profile produces very similar results to “Accurate” in most cases but it is typically faster by multiple orders of magnitude.
As another improvement, arbitrary bed shapes are now supported.
Cut Tool Improvements
New cutting mode is now available in the Cut tool. Dovetail mode automatically creates a tongue-and-groove connection that allows sliding one part into the other. The geometry of the connection is adjustable in the Cut tool dialog. Also, a new connector type was added (Snap).
Text Embossing Improvements
The Emboss tool introduced in 2.6.0 now allows much better projection on curved surfaces. The feature is accessible through a Per glyph orientation checkbox in the the Emboss dialog. When checked, the individual glyphs are (perpendicularly) projected along a curved line on the surface. The idea was inspired by the implementation in BambuStudio.
Version 2.6.0
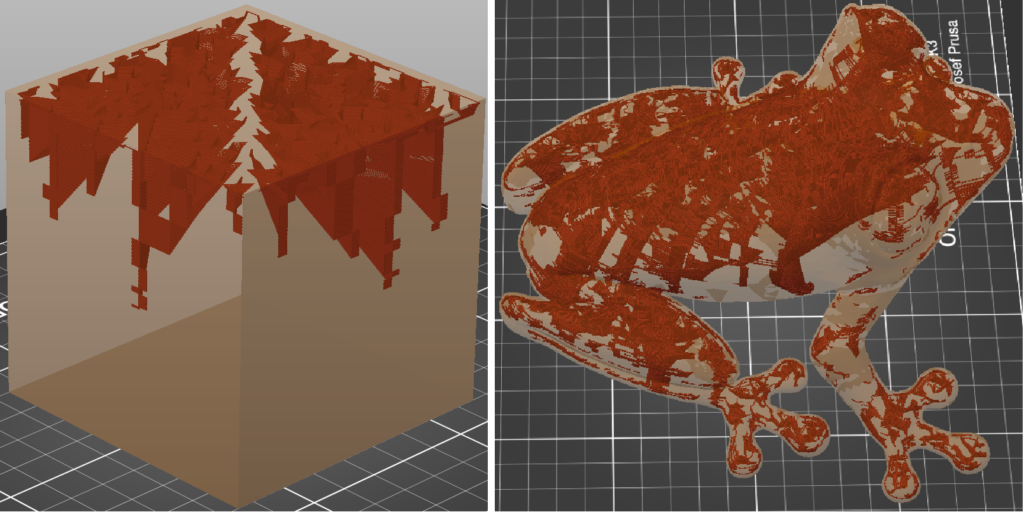
20. 6. 2023Organic Supports
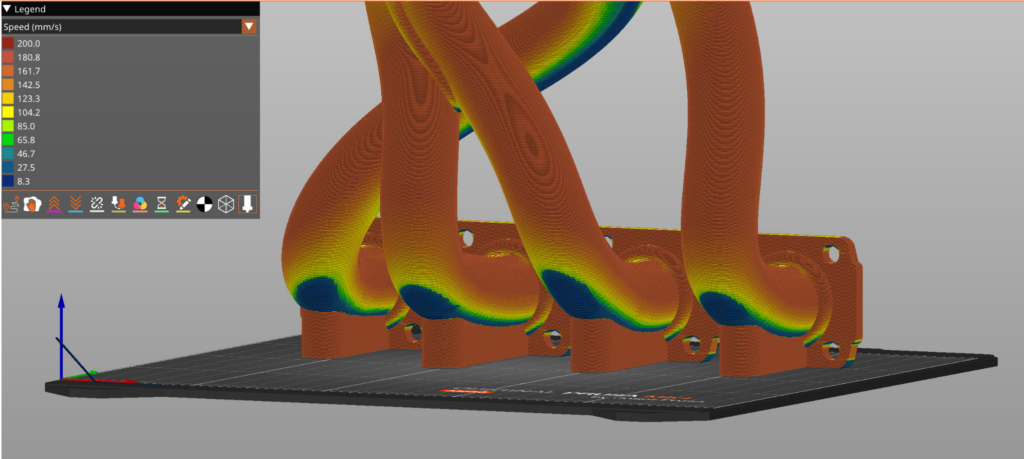
In this release, we are presenting our significantly improved implementation of tree supports, which we call ‘Organic supports‘. We choose a new name for our supports because of their distinctly smooth shape and several differences in their behavior. Our implementation is an evolution of the tree supports by Thomas Rahm, which are significantly improved tree supports originally from Cura. We would like to thank Ultimaker Cura and Thomas Rahm for the effort they have invested into the problem.
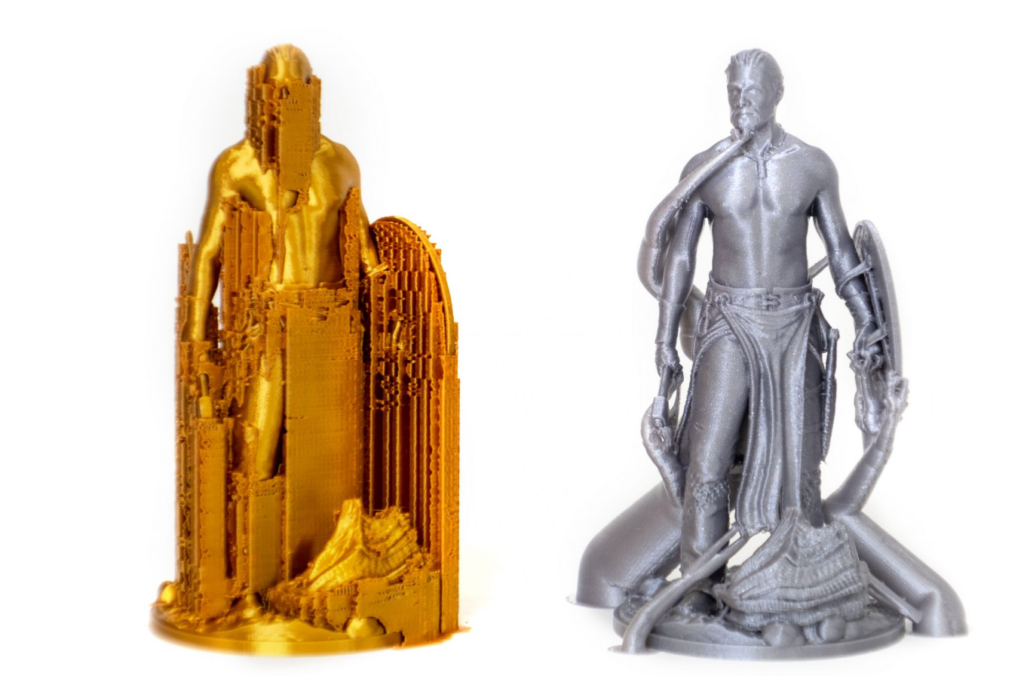
In contrast to the previously common implementation of tree supports, the branching of our Organic supports is smarter and we made them straighter (shorter), smoother, and more stable. The cross-section perpendicular to the branch axis is guaranteed to be circular, and the algorithm automatically uses double perimeter walls for the trees where needed (this is configurable).
The Organic supports are easily removable, do not scar the surface, and are fast and cheap to print. Models can now be printed in orientations that were previously unthinkable (mirroring SLA printing capabilities) and supports for even the most complex shapes are typically easy to remove. Organic supports can be manually enforced or blocked using the Paint-on supports tool.
Automatic FDM Support Painter
PrusaSlicer now has an automatic painting tool for defining areas requiring supports, factoring in various aspects like the model’s center of mass, bed movement, potential extruder collision, material, and bridging. It can also automatically detect if a print requires supports and alert the user in the case they are not enabled.
Text embossing tool
The new Text tool lets you insert, manipulate, and edit text as a 3D object. This provides a convenient way to customize models and add elements such as notes, signs, or serial numbers directly in the slicer.
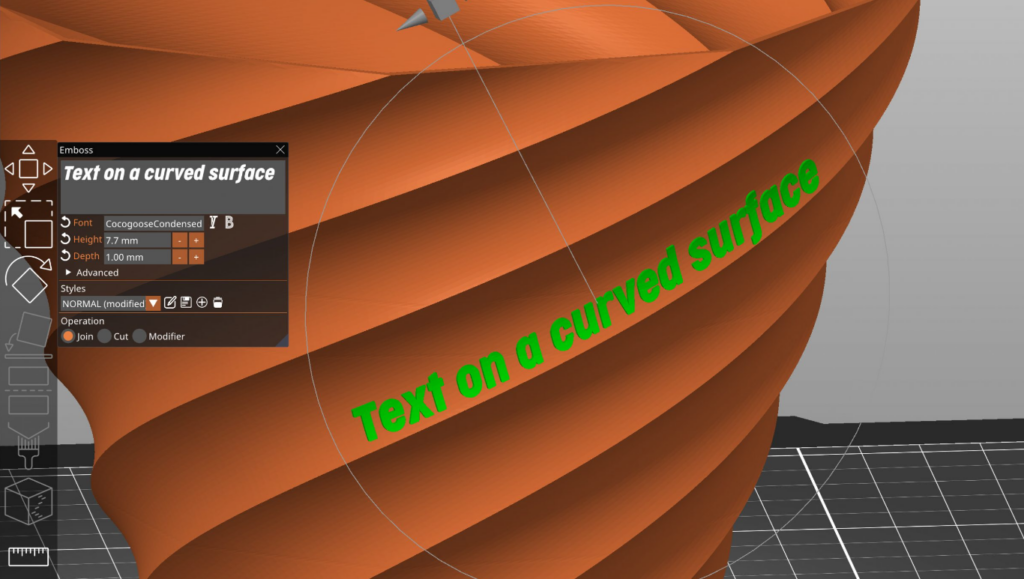
Texts can be embossed, debossed, or even used as a modifier. However, the tool even offers the ability to make the text follow curved surfaces. To change the text position, you can simply drag it on the object’s surface. The text editor automatically imports the font library installed on your device (all TrueType fonts should work).Even after closing the Text tool, the text remains fully editable. The same goes for re-opening 3MF project files. You can also create and save text styles to reuse them in future projects.
Improved Cut tool
The Planar Cut tool has been available in PrusaSlicer for a long time. It is handy for preprocessing huge models that don’t fit the build volume or which are too complicated to print in one piece. With this release, we are extending its functionality.
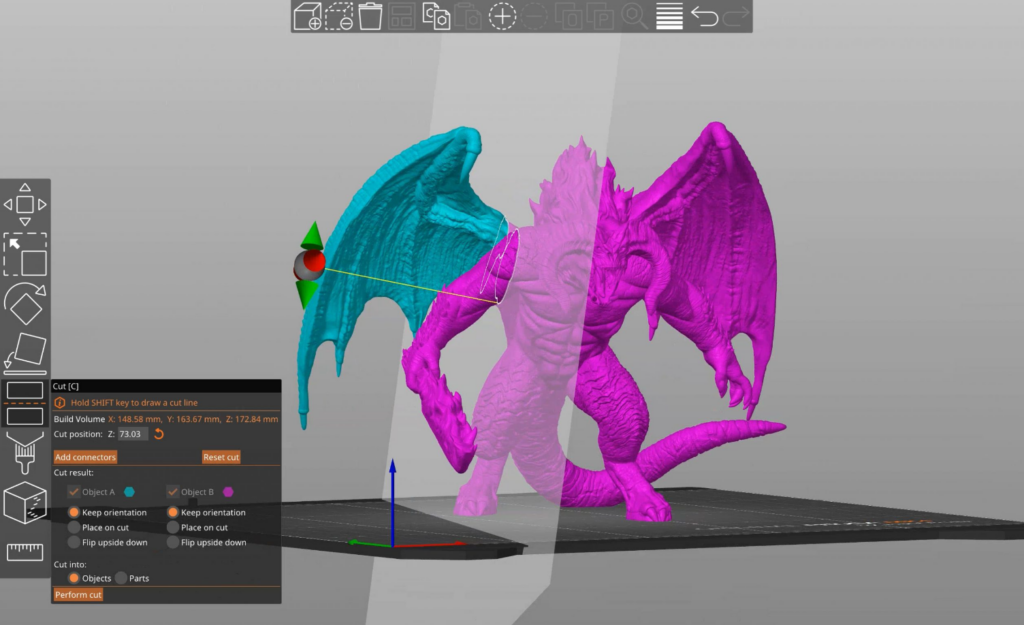
You can newly cut the model at any angle. Defining the precise cutting angle can be done both by a 3D gizmo or by simply drawing a cutting plane by dragging the left mouse button while holding down the Shift key. If the cutting plane intersects the model in several different regions, you can select which parts to cut and which to keep connected by right-clicking on them.
You can select if the cut part should be placed on the bed with the newly created flat surface. You can also choose to keep the alignment of the parts, for example, for printing with a multi-tool printer.
Adding connectors and dowel pins
We understand how important it is to assemble the final parts together with an emphasis on precision and simplicity. That’s why we added an option to define various types of connectors. You can control the depth, size, and tolerances of each connector and the negative hole.
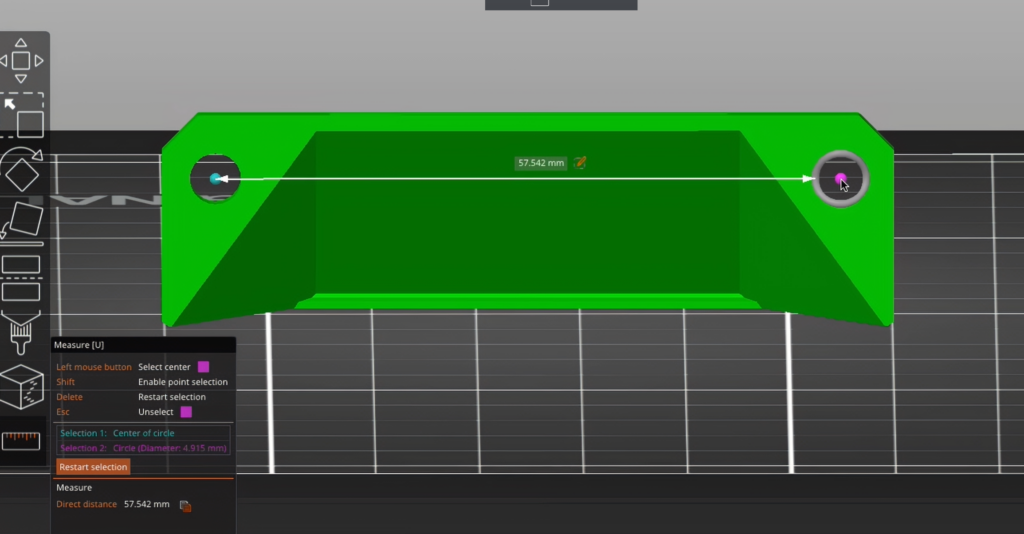
Measurement Tool
PrusaSlicer now includes a measurement tool for gauging distances between vertices, edges, and planes. You can also use it to measure angles, and to scale objects uniformly by editing the measure distance.
Dynamic overhang speed (and dynamic fan speed on overhangs)
This feature lets you slow down the print speed when printing overhangs, which enables better cooling when it’s needed. The algorithm calculates extrusion overlap with the previous layer and applies speed calculated from the overhang slowdown function. Users can control the shape of the overhang slowdown function via four input points – each point has an extrusion overlap value expressed as a percentage of the full width, and desired speed on such overlap. The speeds in between the control points are calculated via linear interpolation.
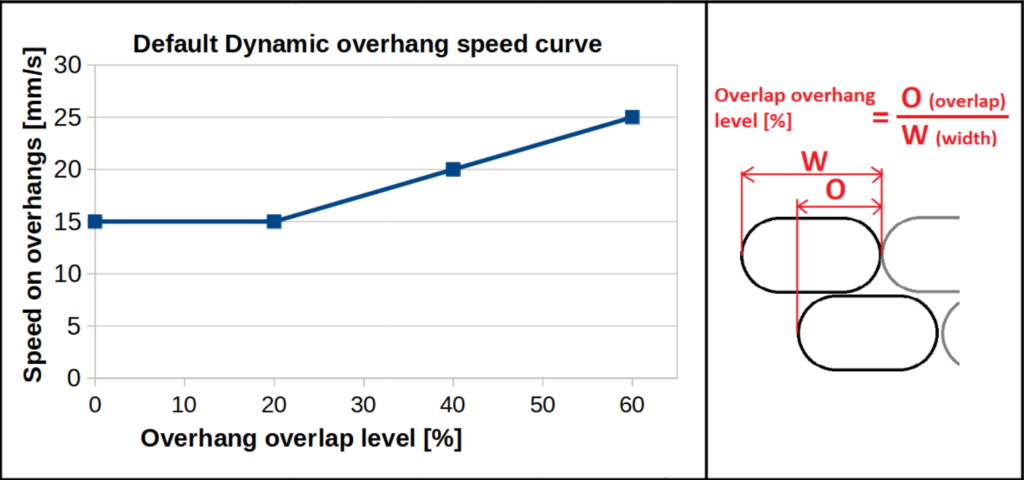
Similarly, users can create custom fan speed curves, so that extreme overhangs get increased cooling. Of course, with some polymers, too much cooling will negatively impact the mechanical properties.
Extending sparse infill
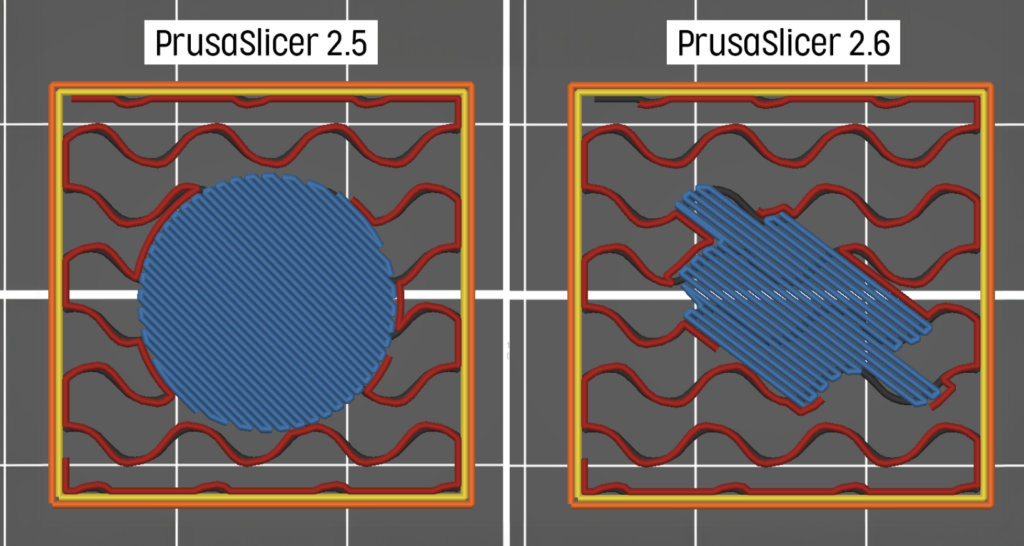
A long-standing issue was connected to bridging solid infill printed over sparse infill. The shape of such infill islands was only determined by what was above, and the infill lines were often inadequately supported as a result, leading to mid-air extrusions and possibly failed prints. PrusaSlicer now extends the lines of the bridge infill so that their ends are supported by the sparse infill on the layer below. The bridge infill is now always using ‘Thick bridges’. The new algorithm works for all infill types. The comparison image below shows exactly the same model (a cube with a counterbored hole in the top face).
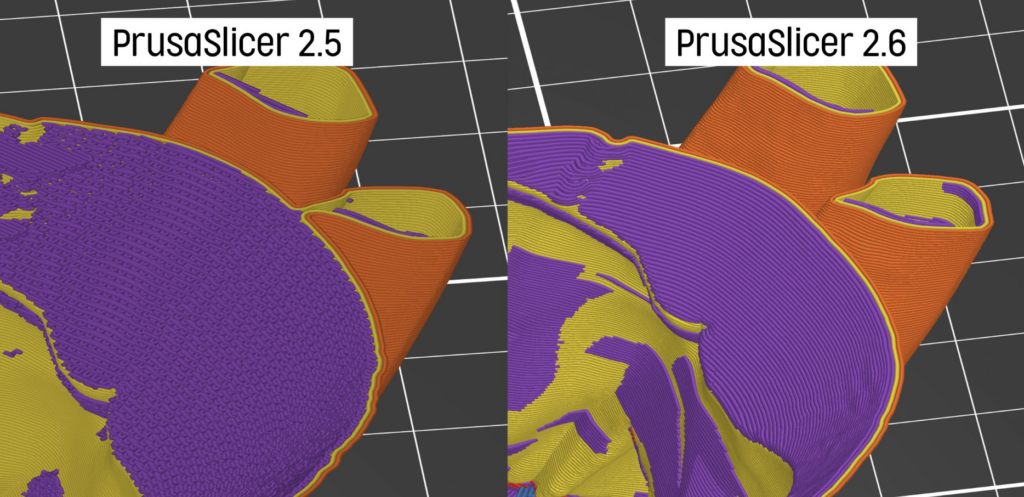
Improved Ensure vertical shell thickness
PrusaSlicer 2.6 improves the handling of vertical shell thickness on sloping surfaces. Previous versions used rectilinear infill to address thinning walls and potential holes in steeply sloped areas. The latest version now identifies regions where short rectilinear lines could cause vibrations and surface artifacts, replacing them with a concentric infill. This method often leads to 10-15% shorter print times without compromising quality.
Other new features
- Option to avoid crossing curled overhangs
- Exporting STL objects with boolean operations
- Assigning tool heads to different features
- Idle temperature settings for multi-tool printers
- Wipe tower stabilizing cone
- One-click import from Pritables.com
- Template filament profiles
- New experimental support for SLA
- One-file vendor profile enables adding new printers without a new PrusaSlicer release
- G-Code thumbnails can now be exported in JPG and QOI formats
- SLA hollowing is now up to 10x faster
- SLA time estimate is now more accurate for the Original Prusa SL1S Speed
- New and updated 3rd party printer profiles
- Arrange’ and ‘Fill bed with instances’ functions now take into account skirt and brim
- More intuitive Klipper firmware support
- Opening 3MF files now gives the option to import the geometry only
- New “PrusaConnect” host type with pre-filled URL
- It is newly possible to set acceleration separately for external perimeters, solid infill and top solid infill
- ‘Set Number of Instances’ now works when multiple objects are selected
- Optional scrolling to mouse cursor rather than screen center
VERSION 2.5.0
6. 9. 2022New perimeter generator Arachne
For years, the strategy PrusaSlicer used when generating perimeters was to offset the contour of the object with an extrusion line of constant width. This caused issues in various cases, especially when printing thin walls, text, or logos.
The developers of Cura recently implemented a new strategy named Arachne based on the paper [Kuipers et al., 2020]. The Arachne generator produces perimeter loops and gap fills with varying extrusion width. Simply put, it automatically makes perimeters wider or thinner as needed. This is a major change! Before, it was nearly impossible to create a wall that would fit 2 perimeters exactly. And now? As long as the wall thickness is close enough to 2 perimeters, PrusaSlicer will take care of the rest.
The new approach produces nicer-looking prints with fewer artifacts. There is a significant reduction in gap fill, small extrusions used to fill gaps between perimeters, which also results in a reduction of print time.
STEP file format support
Starting with this release, PrusaSlicer is able to import STEP files, which is a format widely used for 3D modelling data exchange. Note that the model is tessellated on import and the slicing algorithms operate on the resulting triangle mesh, i.e., the model is not sliced analytically.
We use Open CASCADE Technology (OCCT) development platform to read the STEP files. It is a CAD kernel also used e.g. by FreeCAD or KiCad. Thanks @Open-Cascade-SAS for keeping it open-source. The import implementation itself was ported from BambuStudio, thanks @bambulab.
Lightning infill
Infill serves a dual purpose – to provide structural rigidity and to support top surfaces. In case structural rigidity is not needed, a lot of material and printing time is saved with the new Lightning infill, which is optimized to support the top surfaces only. The lighting infill generates a branching structure that gets progressively denser towards the top surfaces to support them reliably.
The lighting infill is based on paper [Tricard et al., 2019]. Like the Arachne perimeter generator, we have ported the Lightning infill from Cura, thanks again for keeping Cura open source.
Improved seam placement based on the visibility
Starting with this version, seam placement algorithm prefers regions which are not visible from the outside of the model at all or which are occluded from most directions. The new visibility algorithm is applied for seams set to Nearest or Aligned.
In addition, when paint-on seams are used and ‘Aligned’ is set, the resulting seam line attempts to find a sharp corner in the painted area and snap to it, leading to smoother lines along the sharp edge. Previous versions did not detect the sharp edge in this scenario.
Also the new algorithm strives to produce possibly long and smooth seams on smooth surfaces, while the old algorithm often produced disconnected random bits on such surfaces
Pressure equalizer
An FDM 3D printer consists of a motion system and an extrusion system. While the motion system loves to accelerate and decelerate smoothly to reduce vibrations, the extruder loves to extrude at a constant rate for the best extrusion consistency. That means, unfortunately, that the optimal conditions of the motion system and extruder are in conflict.
Bowden-style extruders are especially sensitive to pressure fluctuations, due to the slack in the Bowden tube, they are not able to reproduce rapid changes in extrusion rate reliably. The Pressure equalizer smooths sudden changes in speed between two features (e.g. between printing infill and perimeters) and reduces print artifacts caused by rapid extruder pressure fluctuations.
Before moving from a faster internal perimeter to a slower external perimeter, the pressure equalizer slows down gradually at the end of the internal perimeter to reach the extrusion rate of the external perimeter. Similarly, when moving from the external perimeter to the infill, the start of the infill is slowed down to the external perimeter speed and accelerated gradually.
New printer and material profiles
- Added Creality Ender-3 Neo and Ender-3 S1 Plus profiles
- Added Elegoo bundle (Neptune printers)
- Added new Creality printers (Ender-3 V2 Neo, Ender-3 Max Neo, CR-10 SMART Pro
- Added Infinity3D bundle
Many bugfixes and smaller improvements
- G-Code thumbnails can now be exported in JPG and QOI formats (until now, only PNG thumbnails were supported).
- SLA hollowing was optimized and it is now significantly faster. The difference is especially noticeable on bigger models, where it can be 10x faster than before.
- SLA time estimate was improved and it is now more accurate for SL1S. In addition, “High viscosity tilt time” was added into Printer Settings so the time estimate is correct for printers supporting separate tilt time setting for high-viscosity SLA materials.
- OSX specific: It is now possible to send G-Codes to OctoPrint using self-signed certificates.
- Fixed a crash when using a selection rectangle with the cut gizmo open.
- Windows specific: Dialog asking to send system info shown at startup no longer pops up in case the internet connection is not available.
- Fixed a crash when using auto-rotation with some specific models.
- When using arrange in sequential printing mode, it sometimes tightly violated desired extruder clearance.
- Fixed flickering of colored rectangles in legend in the stand-alone G-Code Viewer.
- When using wipe tower with no sparse layers, the first layer might have ended up too thin and ruined the print.
- OSX specific: Cmd+M shortcut should now minimize the application as expected, restoring the application using the “View All Windows” works.
- When clicking the “Detach from system preset” button in Dependencies section of a profile, the button did not disappear. Also, detaching a printer profile from a system profile broke rendering of custom bed model for both the parent and child profile. Both issues are fixed now.
- Fixed a very rare issue which led to generating a G-Code with commas instead of decimal points (caused by incorrectly set locales on one of the threads).
- Windows specific: Improved detection of corrupted PrusaSlicer.ini configuration file. Very rarely for some unknown reason PrusaSlicer.ini is partially or fully filled in with binary zeros, most likely due to power outage or a bug in hard drive driver.
- OSX specific: When trying to open a G-Code file using drag and drop or “Open with” option, G-Code Viewer would report the file extension as unknown when PrusaSlicer was not already running.
- Filament usage estimate was incorrect when using MMU. The loading and unloading moves were not correctly accounted for, leading to much higher estimate then reality. Only the ‘Sliced Info’ box was affected, the statistics at the end of the G-Code were correct.
- Fixed a crash when rescaling the windows or changing color mode (Windows, OSX). This should fix some spurious crashes happening when moving PrusaSlicer window between two monitors etc.
- Fixed inadvertent deselection after changing and confirming object-specific settings.
- Changing object-specific settings incorrectly inserted two undo/redo snapshots.
- Some configuration options always showed as modified in profiles inherited from the —default— profile.
- Fixed a crash when pressing Ctrl+A while using a painter tool or editing SLA support points or drainage holes.
- Linux specific: Fixed a crash when confirming a value in Height range modifier.
- Drivers & Apps Installer is now able to use offline unattended installation – it should be useful for mass deployment, for example on schools. To make this happen, launch the installator with parameter /VERYSILENT /SUPPRESSMSGBOXES
- We are leaving support for Win32.
VERZE 2.4.2
27. 4. 2022Opravené chyby
- Režim SLA nesprávně zpracovával soubory 3MF ze softwaru třetích stran, což v některých případech vedlo k chybnému umístění SLA podpěrných bodů a otvorů.
- Náhled režimu vázy se nezobrazoval v případech, kdy vlastní startovací G-code postrádal pohyby v Z.
- Při načítání 3MF třetí strany pomocí přetažení. PrusaSlicer se již neptá, zda má být 3MF načten jako projekt (což nedává smysl, protože neobsahuje žádné konfigurace), a načte pouze geometrii.
- Použití výškového modifikátoru vrstvy s čistící věží nebylo možné u více objektů. Čistící věž hlásila, že výškový profil vrstvy je jiný, přestože byl ve skutečnosti nastaven na všech objektech stejně.
- Opraveno padání funkce “Převést z/do jednotek”, když bylo vybráno několik objektů.
- Automatická změna barvy loga v určitých případech způsobila pád PrusaSliceru (pokud se jednalo o jednovrstvý objekt).
- macOS: Nyní je možné PrusaSlicer obnovit kliknutím na ikonu v doku po jeho minimalizaci. Částečná oprava byla již ve verzi 2.4.1, tato verze by ji měla nadobro opravit na všech verzích systému macOS s procesory Intel i ARM.
- Linux: Oprava padání při otevírání projektů v některých případech
Lokalizace
- Opraveny drobné chyby v německém překladu.
- Aktualizována zjednodušená čínská lokalizace.
- Aktualizován slovník brazilské portugalštiny.
Profily
- Přidán Snapmaker bundle (Snapmaker A250, Snapmaker A350).
- Přidány profily pro tiskárny Zonestar (Z5, Z6, Z5X, Z8, Z9
VERZE 2.4.1
24. 3. 2022G-Code substitutions
PrusaSlicer dlouhodobě podporuje zpracování vygenerovaného G-code pomocí externího postprocesoru. Spuštění externího postprocesoru je všestranné, je však složité na nastavení, postprocesorové skripty musí být distribuovány s projektem a musí být k dispozici interpret, který postprocesorový skript spustí (například Python). Shromáždili jsme mnoho reálných případů využití skriptů pro postprocessing a dospěli jsme k závěru, že mnoho z nich by mohl pokrýt jednoduchý nástroj “Najít a nahradit” s porovnáváním regulárních výrazů a substitucí.
Abychom usnadnili život všem, kteří potřebují pouze základní postprocessing, integrovali jsme nyní takový nástroj přímo do PrusaSliceru. Je přístupný z nabídky Nastavení tisku -> Možnosti výstupu a umožňuje přidat řadu dvojic vyhledávání a nahrazování s volitelnou regexovou shodou, citlivostí na velká a malá písmena a shodou celých slov, podobně jako to nabízejí běžné textové editory. G-code se zpracovává před zobrazením náhledu, takže vaše změny budou viditelné v náhledu G-codu.
Další vylepšení
- Umístění švů bylo vylepšeno.
- V režimu spirálové vázy prohlížeč G-codu přiřazoval každému G-codovému segmentu spirály vrstvu, což vytvářelo nadměrný počet vrstev a ztěžovalo kontrolu G-codu. Prohlížeč nově přiřazuje vrstvu jednomu každému otočení spirály.
- Do předvoleb byla přidána nová volba “Dotazovat se na uložení neuložených změn”, která určuje, zda má být uživatel požádán o uložení projektu při ukončení aplikace nebo při načtení jiného projektu.
- Noví zástupci pro názvy výstupních souborů.
- Do předvoleb byla přidána nová možnost “Obnovení polohy okna při spuštění”.
- Přidána katalánská a maďarská lokalizace.
Opravy chyb
- Windows: Oprava padání na některých počítačích při spuštění aplikace.
- Windows: Dark mode je nyní povolen ve všech nových buildech systému Windows.
- Funkce “Umístit plochou na podložku” je u složitých modelů mnohem rychlejší.
- Při pokusu o načtení neplatného souboru se nově zobrazí chybová zpráva, zatímco dříve byla chyba tiše ignorována.
- Bylo opraveno padání při slicování, když byl použit záporný objem na malovaných plochách vícemateriálového modelu.
- Odstraněn prázdný
G1příkaz, který se objevil před tiskem mostních perimetrů - Opraveny některé problémy s kódováním textu v dialogovém okně Fronta tiskových hostitelů
- Opraveno padání při úpravě miniatur v nastavení tiskárny
- Opraveno obtékání textu v modálních dialozích, někdy docházelo ke zbytečnému zalamování řádků.
- V okně “Porovnání přednastavení” chyběl informační text o osekaných hodnotách.
- Byl opraven problém s mezerou v límci při použití vnitřního límce.
Pokud byl vnější límec objektu velmi široký, mohl přetékat do otvoru v jiném objektu - Uložení předvolby po úpravě nesprávně označilo aktuálně otevřený projekt jako uložený
- Některá nastavení zobrazovala matoucí neurčité popisky, když byla upravena na objekt v panelu Manipulace s objektem
- Vylepšená robustnost vícemateriálového malování, které někdy vytvářelo mezery v malované oblasti a nerozšiřovalo ji dostatečně hluboko do původního objemu
- Linux: Ovládací prvky Nastavení tisku a Nastavení filamentu/materiálu byly vypnuty po určité sekvenci načítání projektů a přepínání mezi režimem FDM a SLA.
- Opraven nesprávně zobrazený obrys řezu v nástroji Řez, když se při řezání v režimu SLA objekt vyvýšil kvůli podpěrám.
- Substituce G-codu byly nesprávně použity na počáteční a konečné interní zástupné symboly M73, což neočekávaně zkomolilo příkazy M73
- Substituce G-codu byly nesprávně použity na zakomentovaný konfigurační blok na konci G-codu
- Windows: Při načítání souboru 3MF dvojklikem na soubor se někdy (v závislosti na aktuální místní kódové stránce) název projektu zkomolil, pokud název souboru obsahoval znaky jiné než ASCII. To mohlo také způsobit občasné pády při odesílání souboru do tiskového hostitele
Verze 2.4.0
27. 1. 2022Shrnutí
- Multi-materiálové malování
- Vylepšené podpěry a přemostění
- Galerie Tvarů
- Fuzzy skin (funkce Členitý povrch)
- Tmavý režim pro Windows
- Límec pro jednotlivé objekty
- Negativní objem
- Automatická změna barvy pro loga a nápisy
- Notifikace “tip dne”
- Zjednodušení modelu
- Podpora pro modely letadel 3DLabPrint
- Nové profily tiskáren třetích stran
Multimateriálové malování
Abychom vybarvování modelů pro MMU tisk rychlili a zjednodušili, implementovali jsme nástroje Chytré vybarvení and Vylití barvou. S vybraným nástrojem Chytré vybarvení uvidíte při pohybu myší nad modelem náhled automaticky detekované oblasti k vybarvení. Barva vyplní oblast pod kurzorem myši až k první ostré hraně. Maximální úhel chytrého vybarvení je možné měnit. Pomocí nástroje Vylití barvou můžete rychle změnit souvislé jednobarevné plochy. Samozřejmě si můžete pohled přiblížit a pomocí nástroje Štětec malovat ručně. Velké trojúhelníky se automaticky rozdělí na menší. Během slicování se vybravené oblasti chytře vytáhnou dovnitř, což dává různým barvám/polymerům největší šanci, že se spojí.
Vylepšené podpěry a přemostění
Představujeme nový typ “Přiléhavých” podpěr. Tyto podpěry přesně kopírují tvar převisu. Kompromisem je nižší stabilita vysokých a tenkých sloupců podpěr. Klasické mřížkové podpěry zatím necháváme jako výchozí.
Horní a dolní mezeru podpěr od objektu v ose Z je nyní možné nastavit samostatně. Pokud povolíte podpěry „Pouze na tiskové podložce“, vygenerované podpěry budou oříznuty, aby nikdy nedosedly na horní část objektu. Rozšíření první vrstvy podpěr je nyní konfigurovatelné (to byl velmi častý požadavek). Výtisky na raftu nyní vypadají lépe. Když použijete vynucení podpěr (modifikátorem nebo malováním), podpěry budou ve vybraných místech generovány i když je aktivní „Podpěry pouze na tiskové ploše“ a „Nevytvářet podpěry pod mosty“. Při malování podpěr můžete zvýraznit převisy. Pomocí nového zaškrtávacího políčka můžete omezit tahy štětcem pouze na zvýrazněné převislé trojúhelníky. A konečně je při malování podpěr k dispozici také nástroj “Chytré vybarvení”.
Nový řežim mostů
Nové výchozí chování používá k přemostění aktuální výšku vrstvy. Přemostění je tak spolehlivé na kratší vzdálenosti, ale vypadá výrazně lépe. Toto je strategie, kterou používá většina moderních slicerů. Na staré chování můžete přepnout povolením možnosti „Silné přemostění“. Vzhledem k tomu, že první pevná vrstva nad podpěrami používá nastavení přemostění, má tato změna velký dopad i na povrch modelu po odstranění podpěr.
Galerie tvarů
Nová vestavěná galerie tvarů poskytuje rychlý a snadný přístup k nejpoužívanějším modelům, ať už je používáte jako modifikátory, nebo je přímo tisknete. Mezi výchozí tvary patří základní primitiva (krychle, válec, koule…) a také další užitečné modely, jako válec (lokální límec) nebo symbol recyklace. Knihovnu si můžete rozšířit o své vlastní modely. Pokud přidáte model, automaticky se vygeneruje miniatura. Vygenerovanou miniaturu ve formátu PNG můžete nahradit vlastním obrázkem.
Fuzzy Skin
Funkce Členitý povrch vám umožní vytvořit hrubou texturu na stěnách vašich modelů náhodným odsazením obvodových bodů. Funkce produkuje překvapivě pěkné výsledky a hodí se skvěle pro rukojeti nástrojů nebo pro vytvoření zajímavého povrchu tisku. Skryje také nepřesnosti 3D tisku. Můžete také použít modifikátory k aplikování členitého povrchu pouze na část vašeho modelu.
2-4× Rychlejší slicování
Provedli jsme paralelizaci a optimalizaci generování G-codu. Celková doba slicování je nyní 2× až 4× rychlejší, přičemž vyšší rychlosti dosáhnete hlavně u lepších procesorů s mnoha jádry a vlákny.
Tmavý režim pro Windows
PrusaSlicer již podporoval tmavý režim na OSX a Linux, na základě vaší zpětné vazby jsme implementovali tmavý režim i pro Windows.
Límec pro jednotlivé modely, vnitřní límec
Nastavení límce je nyní specifické pro jednotlivé objekty. Takže můžete zapnout límec pouze pro některé objekty, použít různé šířky límce atd. Tato zdánlivě malá změna si vyžádala překvapivě významnou změnu kódu PrusaSliceru. Nyní můžete také zvolit generování vnějšího límce, vnitřního límce nebo obou zárověn.
Negativní objem
Negativní objem vám umožňuje odečíst jeden model od druhého. Podobně fungují „boolean“ operátory v jiných 3D programech. S jejich pomocí můžete vytvářet například snadno upravitelné díry přímo v PrusaSliceru. Nebo můžete načíst jeden z objektů z nové galerie tvarů jako negativní objem.
Automatická změna barvy pro loga a nápisy
Když PrusaSlicer detekuje, že model vypadá jako logo nebo odznak, nová notifikace vám nabídne automatické přidání změn barev do správných výšek. Tuto funkci navrhl Richard Horne, děkujeme za nápad! Funkce vám ušetří čas a odstraňuje nejistotu při vkládání více změn barev za sebou ve správné výšce.
Tip dne
Přidáváme „Tip dne“ – speciální typ notifikace, často s proklikem pro zvýraznění prvku uživatelského rozhraní nebo s odkazem pro otevření dokumentace ve webovém prohlížeči. Funkci můžete vypnout v předvolbách.
Zjednodušení modelu
Pomocí nové funkce Zjednodušit model můžete snížit počet trojúhelníků. Klepněte pravým tlačítkem na model a z kontextové nabídky vyberte Zjednodušit model. Zjednodušení můžete omezit buď úrovní kvality nebo procentuální změnou počtu trojúhelníků. Tuto funkci lze také použít k vytvoření “low-poly efektu” přímo v PrusaSliceru.
Podpora pro modely letadel 3DLabPrint
Aby bylo možné slicovat modely od 3DLabPrint, PrusaSlicer nabízí novou volbu „Režim slicování“, která umožňuje přepínat mezi režimem „Obvyklý“ a „Paritní vyplňování“. Použijte možnost „Paritní vyplňování“ pro správné slicování letadel od 3DLabPrint. Další nová možnost „Uzavírání děr“ umožňuje vyplnit všechny vnitřní struktury.
Průběh nahrávání
Když posíláte G-code přes síť, zobrazí se nový ukazatel průběhu nahrávání. Stávající dialogové okno „Fronta nahrávání do tiskového serveru“ nově podporuje řazení podle jednotlivých sloupců, přidali jsme sloupec velikosti souboru.
Vizualizace kolizí sekvenčního tisku
Minimální vzdálenosti od objektu jsou nyní vizualizovány a v případě kolize se zbarví do červena. Díky tomu je problém velmi snadné odhalit.
Automatická orientace k SLA tisku
Nově umožňujeme uživateli vybrat si ze 3 různých algoritmů automatické orientace:
- Nejlepší kvalita povrchu
- Snížený sklon převisů (minimální podpěry)
- Nejnižší výška Z (nejnižší doba tisku)
Porovnání profilů
Nyní můžete snadno porovnat rozdíly mezi 2 profily pomocí speciálního zobrazení. Povolte jej výběrem možnosti Okno-Porovnání přednastavení.
Náhled G-codu v textové podobě
Když táhnete vodorovný posuvník na obrazovce náhledu, můžete vidět pořadí pohybů v aktuální vrstvě. Nově také zobrazujeme vygenerovaný G-code na levé straně obrazovky včetně čísla řádku. To lze využít pro pokročilou analýzu G-codu.
Odeslat systémové informace
Abychom mohli zaměřit naše budoucí úsilí, rozhodli jsme se volitelně shromáždit některé obecné informace o systémech, na kterých se PrusaSlicer běžně spouští. Takové systémové informace nám pomohou ukončit podporu zastaralých platforem, které už nikdo nepoužívá. Raději bychom se soustředili na aktuální hardware a operační systémy, abychom zlepšili výkon PrusaSliceru a přinesli nové funkce. Shromážděné konfigurační údaje o systému jsou zcela anonymní a celý obsah informací k odeslání si můžete prohlédnout v dialogovém okně „Odeslat systémové informace“. Tato výzva se zobrazí pouze jednou. Předem děkujeme všem, kteří se rozhodnou s námi sdílet konfiguraci svého systému.
Posun objektu pod tiskovou podložku
Na základě mnoha požadavků nově umožňujeme posun objektu pod tiskovou podložku pro tisk pouze části objektu nad tiskovou podložkou. Pomocí nástroje „Řezat“ toho šlo dosáhnout již v minuých verzích. Nový způsob je ale mnohem jednodušší. Hodí se, pokud potřebujete vyrovnat dno nerovného předmětu, abyste jej mohli tisknout bez raftu. K dispozici je také nové tlačítko „Spadnout na podložku“ v pravém panelu. Průsečík modelu s podložkou je vizualizován bílým obrysem. Přesouvání objektů pod tiskovou podložkou není v režimu SLA prozatím povoleno. Umístění SLA podpěr by bylo nejednoznačné.
VERZE 2.3.3
21. 7. 2021- Opravné vydání – Oprava chyb ve správě Multimaterial FDM projektů a konfiguračních souborů
2.3.2
8. 7. 2021Souhrn
- Podpora tiskárny Original Prusa SL1S SPEED
- Aktualizace firmwaru pro Original Prusa CW1S
- Podpora nového typu hostitele PrusaLinku
- Vylepšení průvodce instalací
- Hladší povrch s monotónní výplní
- Podpora dopředné kompatibility konfigurací
- Opravy chyb
Podpora tiskáren Prusa SL1S SPEED a CW1S
Podpora tiskárny Prusa SL1S. Soubory určené k tisku na tiskárnách Prusa SL1 resp. SL1S se exportují s příponou “.sl1” resp. “.sl1s”. Aktualizace firmwaru nyní podporuje CW1S.
Typ hostitele PrusaLinku
Podpora nového typu hostitele PrusaLink. PrusaLink je nový název pro síťové rozhraní našich tiskáren (SL1/SL1S, MK3 s obrazem PrusaLink Raspberry PI zero) – můžete jej znát také jako Prusa Connect Local. Pracujeme také na PrusaLink pro Prusa Mini. Typ hostitele SL1 v PrusaSliceru byl pro přehlednost přejmenován na PrusaLink.
Hladší povrch s monotónní výplní
V PrusaSliceru 2.3.0 jsme zavedli monotónní výplň pro horní/dolní povrch. Obdrželi jsme zpětnou vazbu, že horní plochy nebyly vždy hladké, protože monotónní výplň byla aplikována pouze na nejsvrchnější výplň, ale ne na pevné výplně pod ní. V PrusaSliceru 2.3.2, pokud je horní pevná výplň monotónní, jsou nově monotónní i všechny vnitřní pevné výplně.
Vylepšení průvodce instalací
Při otevření průvodce instalací za účelem instalace nové tiskárny nebo nového filamentu / SLA materiálu PrusaSlicer nově nabízí před otevřením průvodce nejprve nainstalovat aktualizace konfigurace, protože jinak se uživateli nemusí zobrazit všechny dostupné tiskárny, filamenty nebo SLA materiály.
Podpora dopředné kompatibility konfigurací
Podpora dopředné kompatibility konfigurací. Představte si, že do budoucí verze PrusaSliceru bude přidán nový typ výplně. Pokud by byl vytvořen 3MF s použitím nového typu výplně, PrusaSlicer 2.3.1 by odmítl načíst 3MF, zatímco PrusaSlicer 2.3.2 nahradí neznámý typ výplně svým výchozím typem a tuto náhradu předloží uživateli. Funkce “dopředné kompatibility” podporuje nejen přidávání nových vyjmenovaných hodnot. Například typy výplní nebo příchutě firmwaru) ke stávajícím konfiguračním klíčům, ale také změnu logických symbolů (zapnuto/vypnuto) na vyjmenované hodnoty (například “draft shield” se změní z “enabled/disabled” na “enabled/disabled/limited” v PrusaSliceru 2.4.0.
Opravy chyb a další vylepšení
- Oprava importu některých STL vygenerovaných v OpenSCAD.
- Opraven výkonnostní problém při výpočtu přemostění
- Opraveny bloby při tisku po návratu z G-codu M600 po ruční změně barvy.
- Přidána tiskárna TriLab AzteQ Industrial.
- Různá vylepšení profilů Anycubic, Artillery a Creality.
- Aktualizovány překlady do ruštiny a ukrajinštiny
VERZE 2.3.1
21. 4. 2021Shrnutí
- Univerzální buildy OSX, podpora Apple Silicon
- podpora Chrome OS
- Nové profily tiskáren třetích stran
- Opravené chyby zranitelnosti
- Opraveny chyby s ohledem na PrusaSlicer 2.3.0
Univerzální buildy OSX, podpora Apple Silicon
Počínaje touto verzí PrusaSlicer nativně podporuje nové Apple Silicon MacBooky a MacMini a pracuje přibližně o 30 % rychleji než emulovaný x86-64. Nový Universal build obsahuje binární soubory obou platforem x86-64 a ARM, distribuovaný balíček je tedy o něco větší, než předchozí PrusaSlicer.
Podpora Chrome OS
Chromebooky jsou stále oblíbenější díky své nízké ceně, dobré použitelnosti a stabilitě. Proto jsou Chromebooky pro americké vzdělávací instituce volbou číslo jedna. Google naštěstí nyní nabízí a kontejnerovaný Linux na moderních Chromeboocích hned po vybalení z krabice a PrusaSlicer běží ve virtualizovaném prostředí Linuxu velmi dobře.
Některým uživatelům se PrusaSlicer podařilo spustit v systému Chrome OS již dříve, viz. tento příspěvek.
Instalaci aplikace PrusaSlicer na systému Chrome OS jsme zdokumentovali v našem instalačním průvodci.
Nové profily tiskáren třetích stran
- Bylo přidáno několik profilů tiskáren Creality (Ender-3 Max, Ender-4, Ender-6, CR-5 Pro, CR-5 Pro H, CR-6 SE, CR-6 Max, CR-10 Max, CR-200B, CR-8), díkys @pmjdebruijn.
- Přidány profily tiskáren Artillery (Sidewinder X1, Genius), díky @SzabolcsHornyak.
- Přidány profily tiskáren INAT, díky @MarkINAT.
- Aktualizována textura Anycubic Kossel bed (díkys @brunosso) a Anycubic Kossel bed STL.
Opravené chyby zranitelnosti
Talos Cisco Intelligence Group odvedla skvělou práci při identifikaci potenciálních bezpečnostních problémů při načítání neplatných a potenciálně škodlivých souborů AMF a 3MF, viz jejich zprávy o zranitelnostech TALOS-2020-1222 a TALOS-2020-1218. V této verzi PrusaSliceru jsme opravili tyto dva potenciální bezpečnostní problémy.
Opraveny chyby s ohledem na PrusaSlicer 2.3.0
- Změny OpenGL zmíněné v sekci “Univerzální OSX buildy” také opravily některé problémy související s OpenGL v Linuxu #5889 #6304.
- Snížení počtu nálezů zobrazených v dialogovém okně “Najít možnost konfigurace”, opraveno vyhledávání bez rozlišování velkých a malých písmen pro jazyky jiné než latinka1. #5202.
- Opraven náhled G-codu se zapnutým obarvením pomocí nástroje a vizualizací cest. #6095.
- Opraveno otevírání rozevíracích nabídek v dolní části obrazovky u sestav s více monitory. #2999 #5911 #5957. Tento problém jsme ve wxWidgets opravili a přijali to také v upstreamu.
VERZE 2.3.0
11. 1. 2021Shrnutí
- Malování podpěr (více v naší dokumentaci)
- Ironing (více v naší dokumentaci)
- Monotonní vzor výplně (více v naší dokumentaci)
- Malování pozice švu (více v naší dokumentaci)
- Kubická adaptivní výplň (více v naší dokumentaci)
- Přehled doby tisku podle typu tisku
- Samostatný prohlížeč G-codu (více v naší dokumentaci)
- Přenos nastavení/neuložených změn
- Lepší automatické uspořádání s nastavitelnou mezerou (více v naší dokumentaci)
- Funkce vyhledat nastavení (více v naší dokumentaci)
- Přepracovaná funkce Vyhnout se přejíždění perimetrů (více v naší dokumentaci)
- Fyzické tiskárny (síťové nastavení) (více v naší dokumentaci)
- Nové profily pro tiskárny od ostatních výrobců
- Importování modelu a jeho profilu z .SL1 archivu
- SLA mini supporty
- Vylepšení SLA podpěr pro převisy vzniklé vydutěním
- Vylepšené SLA vydutění
- Volitelné nevyskakovací okno s nastavením
- Skrývání postranního panelu
- Nový systém notifikací (nahrazuje vyskakovací okna)
- Kopírovat-Vložit pro modifikátory a vlastní nastavení ve výpisu objektu
- Nastavitelné ukotvení výplně
- Znatelně rychlejší start programu
Malování podpěr
Nový nástroj Malování podpěr umožňuje malovat přímo na objekt a vybrat oblasti, kde by měly být vynuceny nebo blokovány podpěry. Můžete dokonce vizualizovat převisy a automaticky namalovat vynucovače podpěr na základě nastaveného úhlu převisu. Namalované podpěry se ukládají do souboru projektu (formát 3MF).
Ironing – „žehlení“ horních ploch
Ironing vyhlazuje horní plochy pomocí speciální druhé fáze výplně ve stejné vrstvě. Zahřátá tryska přejíždí přes právě vytištěnou horní vrstvu a zarovná veškerý plast, který se mohl zvednout. Tryska také vytlačuje malé množství filamentu, aby vyplnila všechny díry v horním povrchu.
Monotónní výplň
Pamatujete si viditelné linky nebo „jizvy“ na horní straně modelu, když je poblíž díra nebo text? Tyto artefakty jsou s naším novým vzorem výplně pro horní i spodní vrstvy výrazně potlačeny. „Monotónní“ výplň je v podstatě stará dobrá přímočará výplň s upraveným plánováním trasy.
Adaptivní kubická výplň
Tato výplň automaticky mění hustotu, v závislosti na vzdálenosti k nejbližší stěně. To je užitečné zejména pro velké výtisky s velkým vnitřním objemem. Výsledkem je kratší doba tisku a nižší spotřeba filamentu při zachování dostatečné podpěry vrchních vrstev a podobných mechanických vlastností.
Přehled doby tisku podle typu
Legenda v náhledu nyní ukazuje přehled doby tisku pro jednotlivé části tisku (perimetry, výplň, podpěry a další).
Samostatná aplikace PrusaSlicer G-code Viewer
PrusaSlicer G-code Viewer je odlehčená aplikace, kterou můžete použít k rychlému náhledu G-codu ze všech populárních slicerů. Jeho chování je identické s náhledem v PrusaSliceru (používá se stejný kód), můžete však načíst externí soubor G-codu.
Lepší automatické uspořádání s nastavitelnou mezerou
Funkce Uspořádat je nově nastavitelná. Pravým kliknutím na ikonu „Uspořádat“ v horním panelu nástrojů se otevře dialogové okno. Zde můžete úpravit vzdálenosti mezi objekty a povolit otáčení objektů kolem jejich osy Z.
Přenos nastavení/neuložených změn
Pokud provedete nějaké změny v nastavení a poté se rozhodnete zvolit jiný tiskový profil, v novém dialogovém okně můžete zvolit přenesení změn do nového profilu.
Funkce vyhledávání nastavení
Nejste si jisti, kde se nachází konkrétní nastavení? Použijte novou funkci vyhledávání a dostanete se přímo na stránku, kde se dané nastavení nachází.
Přepracovaná funkce Vyhnout se přejíždění perimetrů
Vyhnout se přejíždění perimetrů je algoritmus k minimalizaci přejezdů nad vnějšími perimetry, což snižuje stringování a zlepšuje celkovou kvalitu tisku. Nový algoritmus je mnohem přesnější a výrazně rychlejší.
Fyzické tiskárny (síťové nastavení)
PrusaSlicer ukládal síťové nastavení do profilu tiskárny. To bylo v některých situacích nepraktické (např. pokud vlastníte více tiskáren, které používají stejný profil). Počínaje touto verzí PrusaSlicer odděluje síťové nastavení od profilu tiskárny do nových profilů fyzické tiskárny.
Nové profily pro tiskárny od ostatních výrobců
Velké díky všem přispěvatelům za profily tiskáren třetích stran! Sbírka se nám pěkně rozrůstá o modely od výrobců jako Anycubic, Creality, Trilab, nebo Lulzbot.
Import z existujícího archivu .SL1
Import modelu i jeho tiskového profilu z existujícího archivu .SL1
Mini SLA podpěry
Mini SLA podpěry v oblastech, kam by se normální podpěry nevešly.
Rychlejší spuštění
PrusaSlicer se nyní spouští mnohem rychleji než dříve.
Další změny
- PrusaSlicer nyní umí konvertovat imperiální jednotky
- Přidána podpora pro Repetier server print host
- Nová horizontální slider pro náhled vrstev
- Aktualizace nastavení nyní běží přes https protokol
- Přepracované nastavení, nyní se záložkami.
Více informací najdete v kompletních seznamech změn dílčích verzí na Githubu: 2.3.0-rc2, 2.3.0-rc1, 2.3.0-beta3, 2.3.0-beta2, 2.3.0-beta1, 2.3.0-alpha4, 2.3.0-alpha3, 2.3.0-alpha2 a 2.3.0-alpha1.
VERZE 2.2.0
23. 3. 2020Shrnutí
- Sdružené profily pro tiskárny třetích stran
- SLA vytváření dutých modelů (více informací v naší Znalostní Databázi)
- Adaptivní kompenzace rozplácnutí první vrstvy(více informací v naší Znalostní Databázi)
- Automatická variabilní výška vrstvy(více informací v naší Znalostní Databázi)
- Uložit na SD/USB, vysunout(více informací v naší Znalostní Databázi)
- 3MF miniatury
- Instalace profilů filamentu
- Lepší plánování trasy
- Znovu načíst z disku 3MF soubor(více informací v naší Znalostní Databázi)
- Vložit pauzu/ uživatelský G-kód v určité výšce(více informací v naší Znalostní Databázi)
- Přiřazení barev u Barevného Tisku nástrojem pro výběr barev
- Barevný Tisk pro MMU2 (více informací v naší Znalostní Databázi)
- Menší čistící věž bez řídkých vrstev(více informací v naší Znalostní Databázi)
- Nastavení minimální vrchní / spodní tloušťky (více informací v naší Znalostní Databázi)
- Sekvenční tisk (nastavení pořadí objektů, štítků v 3D náhledu) (více informací v naší Znalostní Databázi)
- Menší čistící věž bez řídkých vrstev
- Podpora 3dconnexion SpaceMouse (podpora free kamery) (více informací v naší Znalostní Databázi)
- Přidat základní tvary přímo v PrusaSlicer (kostka/koule/válec)
- Lepší SLA podložka kolem objektu
- Správné překrývání okraje/límce
- Podpora OSX Dark Mode (čekáme na Windows Dark Mode API)
- SLA statistiky – hmotnost + cena
- Gyroidní a 3D plástvové výplně kopírují perimetr (optimalizace gyroidní výplně – méně segmentů)
- Náhled – obarvení odpovídající rychlosti ventilátoru
- Podpora FlashAir a Astrobox pro nahrávání z hostu
- Přepracované okno klávesnicových zkratek
- Překlady (cs, de, es, fr, it, ja, pl, pt-BR, nl)
SLA Vytváření dutých modelů
V režimu SLA jsme přidali vytváření dutin s generováním drenážních otvorů. Vytvoření dutého modelu je skvělý způsob, jak snížit spotřebu pryskyřice a vnitřní napětí u větších modelů.
Sdružené profily pro tiskárny třetích stran
Při výběru a správě profilů pro každého dodavatele budeme spolupracovat vámi – komunitou .
Adaptivní kompenzace rozplácnutí první vrstvy
Když je při tisku na vyhřívané tiskové podložce první vrstva rozmáčknuta , je ve výsledku širší než by měla být. Kompenzace rozmáčknutí první vrstvy je užitečná funkce, která brání rozmáčknutí jejím mírným zmenšením. Předchozí verze PrusaSlicer však zmenšovala i tenké čáry, což byl problém. Nová adaptivní verze nyní správně respektuje tenké čáry, a vše ostatní zmenšuje o nastavenou hodnotu. Profily Official Prusa budou mít od této chvíle tuto funkci ve výchozím nastavení zapnutou.
Automatická variabilní výška vrstvy
Variabilní výška vrstvy může být nyní vypočtena automaticky, nicméně pořád můžete manuálně nastavit křivku výšek.
Uložit na SD / USB, vysunout
Pokud vložíte SD kartu nebo USB flash disk, automaticky se objeví odpovídající tlačítko pro ukládání G-kódů na vyměnitelná média. Objeví se zde také tlačítko pro vysunutí.
3MF miniatury
Uložené soubory 3MF projektů mají nyní pohledné miniatury, které jsou mimochodem podporované i na prusaprinters.org.
Instalace profilů filamentu
Do průvodce konfigurací bylo přidáno filtrování profilů filamentů.
Lepší plánování trasy
Plánování trasy bylo vylepšeno a nyní vytváří menší množství přesunů nástroje.
Znovu načíst z disku 3MF soubor
Funkce Znovu načíst z disku nyní funguje i u opětovně otevřených 3MF souborů. Tato funkce je vynikající pro případy, kdy jste vytvořili novější verzi svého modelu a chcete nahradit starou verzi v PrusaSlicer, aniž byste museli znovu nastavovat věci, jako jsou vlastní podpěry nebo modifikátory.
Vložit pauzu/ uživatelský G-kód v určité výšce
Funkce, kterou komunita velmi žádala umožňuje vložení pauzy v určité výšce. To lze použít k vložení magnetů, závaží nebo matic do vašich výtisků. Získáte též odhady času do každé pauzy. A lze nyní vložit v určité výšce i vlastní G-kód. To je užitečné pro pokročilé uživatele při vytváření kalibračních G-kódů, jako je například teplotní věž.
Přiřazení barev u Barevného Tisku nástrojem pro výběr barev
Při přidávání změny barvy lze teď vybrat barvu a získat věrohodný náhled.
Barevný Tisk pro MMU & menší čistící věž bez řídkých vrstev
Přidali jsme barevný tisk pro MMU. Toto je poněkud složité, ale jednoduchý případ použití nahrazuje manuální změnu barvy automatickým přepínáním prováděným MMU. Pokud již mluvíme o MMU, přidali jsme také možnost vyrobit čistící věž bez řídkých vrstev, což snižuje spotřebu filamentu a často i dobu tisku.
Nastavení minimální vrchní / spodní tloušťky
Nyní lze nastavit minimální tloušťku vrchní a spodní stěny, co je užitečné zejména při použití funkce variabilní výšky vrstvy.
Sekvenční tisk (nastavení pořadí objektů, štítků v 3D náhledu)
Pořadí sekvenčního tisku nyní odpovídá pořadí umístšní modelů v seznamu objektů. Pořadí můžete jednoduše změnit přetažením objektu. Navíc stisknutím klávesy E uvidíte číslo a název objektu v 3d náhledu.
Další změny
- Podpora 3dconnexion SpaceMouse (podpora free kamery)
- Základní tvary mohou být nyní přidány přímo v 3D náhledu.
- SLA statistiky
- V současnosti poskytujeme vystavení pro Raspberry Pi4, takže PrusaSlicer může běžet na tom samém serveru jako například Octoprint server.
- Na OSX jsme přidali podporu pro Dark Mode.
- A přepracovali jsme okno klávesnicových zkratek.
- Více informací na Github changelogs: 2.2.0-rc5, 2.2.0-rc4, 2.2.0-rc3, 2.2.0-rc2, 2.2.0-rc, 2.2.0-beta, 2.2.0-alpha4, non-public 2.2.0-alpha3, alpha2 and alpha1
VERZE 2.1.0
16. 9. 2019Zpět/Vpřed
Všechny akce v prostředí podložky je nyní možné vzít zpět, včetně výběru objektu a akcí v bočním sloupci (přidání modifikátorů a změny jejich atributů). Věříme, že jsme udělali nejlepší Undo/Redo implementaci ve světě FFF a SLA slicovacích softwarů. 😉
Výškové modifikátory
Stejně jako klasické modifikátory, i tyto vám umožňují změnit nastavení specifických částí modelu. Rozdíl je v tom, že klasické modifikátory jsou založeny na geometrii – například si na plochu umístíte válcovou oblast, uvnitř které bude odlišný typ výplně apod. Výškové modifikátory jsou definovány výškou v ose Z – díky nim můžete nastavit například různou hustotu výplně v různých výškách, třeba hustější výplň na podstavec, řidší na zbytek modelu apod.
SLA umístění objektů přímo na podložku
Počínaje PrusaSlicerem 2.1 je nyní možné umístit objekt přímo na tiskovou platformu a vygenerovat podpory kolem něj, případně pod něj vygenerovat i podložku (pad).
Perspektivní kamera
PrusaSlicer nově umožňuje přepínat mezi ortografickou a perspektivní kamerou. Právě perspektivní kamera je nově výchozí volbou. Jedná se o způsob zobrazení, který odpovídá perspektivě, jak ji vnímá lidské oko – objekty v dálce jsou menší, objekty blíže jsou větší. Nakonec možná budete pohledy přepínat dle potřeby, protože každý z nich má své výhody.
Export cesty jako OBJ
Pohyb trysky u FFF tisku je nyní možné vyexportovat jako soubor OBJ a použít jej k vyrenderování fotorealistického obrázku výtisku. Původní ideu a kód pro tuto funkci nám poskytl Paul Arden, děkujeme. Cesta může být vyexportována po vygenerování G-Codu v menu Soubor->Export->Export cesty
Vlastní modely tiskové podložky
PrusaSlicer nyní umožňuje nastavit vlastní textury a modely pro zobrazení tiskové podložky. Podporovány jsou formáty PNG a SVG. Obrázek a model můžete přiřadit k tiskovému profilu v dialogu “Tvar podložky”. Kompletní cesta k souborům je uložena v proměnných tiskového profilu “bed_custom_texture” a “bed_custom_model”.
Další vylepšení
- Částečné uspořádání – skvělé pro situace, kdy už na tiskové podložce nějaké objekty máte a importujete ještě pár další modelů. Ty pak můžete označit a nechat program, aby je sám rozmístil do existujících mezer
- Maximální velikost – vyberte objekt, přepněte na nástroj Změna velikosti (klávesa S) a stiskněte klávesu F – tím se model zvětší na maximální rozměry, které mu tisková plocha dovolí
- Vylepšená funkce Color Change (změna barvy podle vrstev)
- Překlady do češtiny, němčiny, polštiny, španělštiny, francouzštiny a italštiny
- Rychlejší start
- Rychlejší generování stromových podpěr pro MSLA tiskárny
- Selektivní slicování
- Modifikátory a části objektů nyní mohou být přetaženy na tiskovou podložku
VERZE 2.0.0
15. 4. 2019- Změna názvu ze Slic3r PE na PrusaSlicer
- Vylepšení uživatelského rozhraní – Přepracován UI ke zvýraznění klíčových funkcionalit
- Jednoduchý / Pokročilý/ Expert módy- Zelený: bezpečný pro bádání začátečníka ; Žlutý– pokročilý uživatel by mohl chtít upravit tyto parametry; Červený– expertní nastavení jejichž většiny by se mělo dotknout jenom v případě, že chcete vytvořit profil pro novou tiskárnu
- Nové pracovní nástroje, ikony a zkratky – oba, horní a levý panel nástrojů byly přepracovány. Všechny ikony byly nově navrženy a byla implementována podpora vektorových ikon.
- Vše přímo v 3D pohledu
- Gizma pro posun, otáčení a změnu měřítka a postranní panel pro manipulaci objektů – Přidali jsme nová gizma pro manipulaci objektů pro přesun, otáčení a změnu měřítka ve všech osách a taktéž je podporovaná anizotropní změna měřítka.
- Seznam objektů, hierarchie scén a instance – Seznam objektů v pravém postranním panelu zobrazuje nyní hierarchii objektů, jejich instance, parametry objektů, objemy objektů a modifikátory .
- Uživatelsky nastavitelné podpory – Kontextové menu modelu (kliknutí pravou myší na model) vám nyní umožní vytvořit blokátory podpory a vynucené podpory.
- MSLA slicování – PrusaSlicer je první dostupný vysoce kvalitní open-source MSLA slicer.
- Změna barvy přímo v PrusaSlicer
- Zdrojový kód v Pearl byl přepsán do C++
- Soubor projektu – Soubor/Uložit projekty uloží nyní 3MF soubor obsahující všechny objekty, nastavení, modifikátory a jejich parametry.
- Podpora HiDPI – Správné škálování na displejích s vysokým rozlišením
- Odhad času a spotřeby materiálu je nyní vypočten ještě před exportem
- Zpracování na pozadí – nově navrženo tak, aby fungovalo spolehlivě a pouze ty kroky slicování, které byly zrušeny uživatelem, budou opět slicovány
- Vylepšení multi-material – lehčí přiřazení barev a více
- Fronta nahrávání do Octoprint – odesílání dat do Octoprintu by předtím blokovalo uživatelské rozhraní
- Tlačítka “Slicuj nyní” a “Export” byly sloučeny do jednoho tlačítka
- Podpora pro OctoPrint Cancelobject plugin – děkujeme @supermerillovi
- Anizotropní změna měřítka– podržte CTRL a táhněte za jeden bod gizma pro měřítko (ne za rohy) k nastavení měřítka modelu v jedné ose
VERZE 1.41.3
12. 2. 2019- Profily tiskárny pro nové varianty tiskáren – MK2.5S, MK3S, MMU2S
- Aktualizovaný konfigurační asistent GUI
VERZE 1.41.2
23. 11. 2018- Vylepšený výkon OpenGL vykreslování OpenGL v OSX Mojave
- Opraveny některé havárie při slicování multimateriálních tisků
- Opraven nesprávný výběr extruderu po přepnutí z profilu tiskárny multi-material na profil tiskárny single-material.
VERZE 1.41.1
27. 10. 2018- Uživatelsky nastavitelné podpory – blokátor podpory & vynucené modifikátory
- Zvýšená kvalita podpor
- Opraven Material a vylepšení
VERZE 1.41.0
30. 8. 2018- Podpora aktualizace Multi Material 2.0
- Čistit do výplně anebo do objektu
- Přepracované uspořádání objektů (umístit na podložku)
- Přesný odhad doby tisku pro tichý mód
- Implementovaná funkcionalita “Zbývající čas do konce tisku” (požadován firmware 3.3.0 nebo vyšší)
- Otáčení & změna měřítka objektu
- Aktualizovaná detekce, zda se model vejde do pracovního prostoru
- Vylepšená čistící věž
VERZE 1.40.1
5. 7. 2018- Rozšíření pro firmware updater pro MK3 (nyní dovoluje nahrát firmware 3.3.0 a vyšší včetně podpory dalších jazyků – češtiny, italštiny, španělštiny, polštiny a němčiny)
- Zobrazování reálné tiskové podložky pro MK2 a MK3
- Podpora služby NetFabb STL pro opravu STL souborů pod Windows 10
- Vylepšená integrace Octoprintu
- Vylepšené nahrávání AMF souborů
- Opravy chyb
VERZE 1.40.0
14. 6. 2018- Vylepšený náhled na G-code
- Stažení přednastavení
- Ikony specifické pro tiskárny odstraněny. Nové řízení nastavení pro všechny tiskárny a nový konfigurační návod
- Enhanced Multi Material support
- Úplný překlad do sedmi jazyků (Čeština, Francouzština, Němčina, Italština, Polština, Španělština a Ukrajinština )
- Detekce, zda se model vejde do tiskového prostoru
- Výplň Gyroid
- Podpora 3MF formátu, AMF komprese
A mnohé další (viz níže kompletní seznam změn Github)